Set Up Dual-View Dash Cam: Front & Rear
A dual-view dash cam system is a game-changer for enhancing your vehicle’s safety and security. By capturing footage from both the front and rear, it provides comprehensive coverage that can protect you in accidents, disputes, or even parking lot mishaps. If you’re ready to boost your peace of mind, setting up this system is easier than you might think.
In this guide, you’ll learn how to install a dual-view dash cam step by step, ensuring both cameras are positioned for optimal coverage. From choosing the right model to wiring and securing the setup, you’ll gain the confidence to handle it like a pro. Whether you’re a first-time installer or upgrading your current system, this article will help you get it done right.
What Is a Dual-View Dash Cam System?
A dash cam front and rear system records footage from both the front and rear of your vehicle, providing simultaneous camera angles. This setup is widely used to increase safety and document incidents from multiple perspectives.
Front cameras monitor road activity, capturing collisions, traffic violations, or other road events. Rear cameras, on the other hand, keep track of what’s happening behind your vehicle, including rear-end accidents, tailgaters, and parking lot events.
The system typically includes two cameras, a power source, and a storage device to save recordings. Some models allow seamless video integration, displaying both front and rear views on a single screen or providing separate footage for detailed analysis.
Installing a dual-view dash cam system can give you an additional layer of evidence in disputes and insurance claims by covering blind spots and offering broader visibility.
Benefits of Front and Rear Dash Cam Coverage
Dual-view dash cam systems capture incidents from two angles, offering a complete record of events. This helps substantiate claims during accidents or disputes with clear video evidence.
Wide-angle lenses and high-resolution video enhance clarity, making it easier to analyze details like license plates or driver behavior. Recording quality often reaches up to 4K, improving both front and rear visibility.
Rear coverage proves critical for documenting collisions, such as rear-end impacts or hit-and-run cases. This ensures accountability where the cause may otherwise remain contested.
Constant recording provides security even when parked. Features like parking mode can monitor activity around your vehicle, helping deter vandalism or theft.
Visible cameras act as deterrents, discouraging potential criminals. The presence of coverage can lead them to avoid targeting your vehicle.
Comprehensive documentation protects you in legal or insurance scenarios, building confidence regardless of driving conditions.
Choosing the Right Dual-View Dash Cam
Selecting an effective dual-view dash cam involves evaluating technical specifications and matching features to your driving needs. Consider the following aspects when making a choice.
Key Features to Consider
- Resolution: Look for models offering at least 1080p video; 2K or 4K options deliver clearer recordings for detailed review.
- Viewing Angle: Opt for cameras with fields of view between 140° and 180° for broader coverage.
- Night Vision: Ensure effective low-light recording to maintain quality in dark conditions.
- Loop Recording: Choose continuous recording features with motion detection to avoid missing critical events.
- Storage Capacity: Select models supporting high-capacity microSD cards (128GB or higher) for extended recording durations.
- Connectivity: Built-in GPS logs speed and location, while Wi-Fi allows video transfer to mobile devices.
Do you prefer compact designs? Try single-unit cameras with dual lenses. 360° cameras like the Insta360 X5 offer all-around coverage in a compact form, capturing everything in front, behind, and beside your vehicle without needing multiple lenses. Separate front and rear units offer flexibility but require more space.
Compatibility With Your Vehicle
- Windshield placement: Confirm the dash cam fits the available space and doesn’t block your view. Test placement before buying to avoid issues.
- Power Options: Check if your vehicle’s USB port or 12V outlet matches the camera’s power needs. For parking surveillance, hardwiring may be necessary.
- Wiring Length: Ensure cables can extend from the front camera to the rear without strain or tangling. Short cables often require extensions.
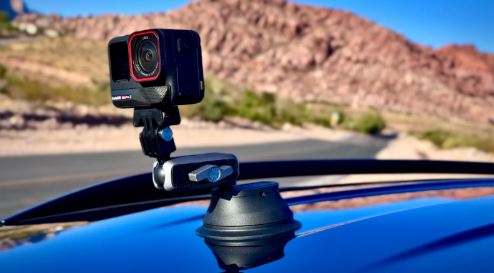
- Mount Type: Adhesive mounts suit fixed setups, while suction mounts allow easy repositioning.
Does your vehicle’s layout affect installation ease? Evaluate these factors beforehand to ensure a smooth setup process.
Tools and Materials Needed for Setup
Dash cam units
Install both front and rear cameras to capture complete footage during driving and parking.
Power cables
Include a cigarette lighter adapter for simple installation or a hardwiring kit for connecting to the vehicle’s electrical system.
Memory cards
Use SD cards with sufficient storage capacity to record high-resolution video footage.
Wiring clips or adhesive tape
Secure cables along the vehicle’s interior to prevent tangling or obstruction.
Fuse tap
Connect hardwired dash cam systems to the fuse box for a direct power source.
Rubber boot or cable protectors
Shield cables that pass through weatherstrips to avoid wear or wiring damage over time.
Step-By-Step Guide to Installing a Dual-View Dash Cam System
A dual-view dash cam system provides front and rear video coverage, enhancing safety and accountability. Follow these steps to ensure a seamless installation process.
Preparing Your Vehicle
Unbox the system and confirm that all components are included and undamaged. Organize these parts to simplify the setup.
Decide on a cable-routing path that gives a tidy look. Plan placements to avoid blocking your driving view.
Mounting the Front Dash Cam
Identify an appropriate spot, usually behind the rearview mirror or at the center of the windshield.
Attach the dash cam securely using the provided adhesive or suction mechanism. Verify that it’s stable and won’t obstruct visibility.
Installing the Rear Dash Cam
Pick a location such as the rear windshield or a flat surface in the vehicle’s back area.
Fix the rear unit using adhesive or suction tools. Confirm the angle captures a clear view of the rear scene.
Connecting Cables and Power Supply
Plug the front camera’s power cable into the cigarette lighter socket or connect it through a hardwiring kit.
Run the cables neatly along door edges or trim panels using clips or adhesive strips. Connect the rear cam to the front unit with the designated cable if using a wired setup.
Testing and Adjusting the Cameras
Turn on your car to check if both cameras power up and begin recording. Inspect the footage to confirm functionality.
Adjust the angles for comprehensive views. Use manual controls or paired apps to fine-tune positions for optimal coverage.
Before finalizing, confirm that both cameras record properly and all cables remain hidden.
Tips for Optimal Performance
Select an Adequate SD Card
Choose an SD card with sufficient capacity and reliable read/write speeds. Cards labeled Class 10 or UHS-I work well for continuous high-resolution recording.
Check Firmware Regularly
Install updates when available to improve camera functionality and add features. Manufacturers often release updates to fix bugs or enhance usability.
Maintain Image Clarity
Clean the lenses periodically to prevent dust or smudges from affecting video quality. Use a microfiber cloth for safe cleaning.
Secure Wiring Effectively
Inspect and adjust cable routing to prevent tangling or detachment. Loose wires can interfere with driving or damage over time.
Test Settings Periodically
Review camera angles and recording settings after positioning adjustments. Verify that the front captures the road clearly and the rear aligns with traffic lines.
Optimize in Parking Mode
If your system supports parking surveillance, enable it when parked. Adjust sensitivity to avoid excessive recordings, like tree movement.
Common Setup Mistakes to Avoid
Incorrect Wiring
Connect the front and rear cameras securely to the main unit and power source. Loose or tangled wires may disrupt functionality and reduce system reliability. Plan cable routing carefully, especially for rear camera cables traveling through the vehicle’s interior.
Insufficient Power Supply
Use a stable power source to keep the cameras functioning. A faulty connection or low-quality adapter may cause interruptions during recording. Hardwiring the system can provide consistent power.
Poor Camera Placement
Position cameras for clear, unobstructed views of the road. Avoid mounting behind tinted areas of the windshield or where sunlight glare can interfere with footage quality. Test angles after installation to ensure optimal field coverage.
Inadequate Video Quality
Adjust the resolution to at least 1080p for clear recordings. Verify video settings within the system’s menu, focusing on frame rate and lens adjustments to eliminate blurriness.
Neglecting Regular Testing
Test the cameras periodically to ensure proper operation. Look for issues like misaligned views, power loss, or memory errors. This practice can help you detect potential problems early.
Conclusion
A dual-view dash cam system is a valuable investment for enhancing your safety and peace of mind on the road. By capturing detailed footage from both the front and rear, it ensures you’re prepared for any unexpected situations. With the right setup and maintenance, you can rely on your dash cam to provide clear, reliable recordings whenever you need them.
Take the time to choose a system that meets your needs, install it properly, and keep it in top condition. Whether you’re driving or parked, this technology offers an added layer of security, making every journey safer and more confident.