Why Framed Fixed Glass Shower Panel Is the Smart Choice for Modern Bathrooms
In bathroom design, every minor detail matters and one aspect that often separates an elegant, functional shower from a messy one is your choice of enclosure. The framed fixed glass shower panel may not always grab headlines like frameless or walk-in showers, but it offers a compelling blend of practicality, durability, and visual clarity. This article is written for homeowners, interior designers, and contractors who are seriously considering a fixed glass solution. We’ll deep-dive into its benefits, design options, technical specifications, installation tips, maintenance, and trade-offs.
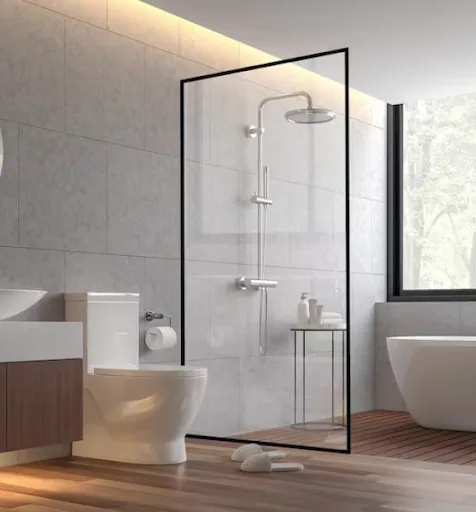
What Exactly Is a Framed Fixed Glass Shower Panel?
A framed fixed glass shower panel is a stationary glass partition, typically attached to a wall or floor via a metal frame (usually aluminum or stainless steel). Unlike swinging doors, these panels remain fixed in place, directing water flow and creating a partial enclosure.
Why Choose a Framed Fixed Glass Panel?
Water Containment with Minimal Fuss
A fixed shower glass panel gives you a clean boundary against splash more effective and elegant than curtains. Combined with a threshold or curb, it helps confine water to the shower zone.
Structural Stability
The frame adds rigidity. In a framed solution, the glass is less prone to flex or vibrate, which can reduce the risk of micro-cracks over time. This is especially beneficial in narrower bathrooms or where walls might be slightly out-of-plumb.
Cost Efficiency
Generally, framed fixed panels are more budget-friendly compared to fully frameless systems. You can use slightly thinner tempered glass due to the structural support of the frame, bringing down cost without severely compromising aesthetics.
Easier Installation and Adjustment
Because the frame helps absorb minor misalignments, installation tolerances are looser compared to fully frameless systems. That means faster labor and fewer callbacks for sealing or alignment problems.
Versatility and Aesthetic Options
Even within the framed category, you have flexibility, clear glass, low-iron “ultra clear,” frosted or textured finishes, tinted glass, or coatings for water repellency. Hardware finishes (chrome, brushed nickel, matte black) give you design control.
Safety & Code Compliance
When built with tempered or toughened glass, these panels meet safety norms even if cracked (they shatter into small safer fragments). As per industry sources, many modern glass shower panels are safety-rated and processed to toughened standards.
Technical Specifications & Design Considerations
To choose or specify a fixed shower enclosure glass panel that performs well, pay attention to these technical factors:
Glass Thickness & Type
- Commonly 8 mm to 12 mm tempered/toughened glass is used.
- In framed or semi-framed systems, you might safely use 8 mm; frameless often demands 10–12 mm.
- Choose low-iron glass if you want minimal green tint and maximal clarity.
- Some systems offer coated glass (hydrophobic / water-repellant) which helps with maintenance.
Panel Dimensions & Coverage
- Height: Typically, 1800 mm to 2000 mm (or higher for custom jobs).
- Width: Varies depending on shower layout, fixed panels can range from 600 mm up to 1200 mm or more, subject to structure and enclosure design.
In Walk-In Layouts, the fixed panel doesn’t necessarily span full width, it acts more as a splash guard.
Frame Types & Profiles
- Full Framed: Frame around all four edges of the glass.
- Semi-Framed / Partial Framed: Frame present only on select edges or one side.
- U-Channel + Top Cap: A minimal frame that holds glass in a bottom groove (U-channel) and top rail; often seen in semi-framed designs.
Choose profiles that allow for adjustability (e.g. shim slots) to compensate for uneven walls.
Sealing & Waterproofing
- Use silicone or neutral-cure sealant along glass-to-frame joints.
- Optional gaskets or drip rails can help reduce water migration.
- On the floor side, consider a small threshold or a sloped curb (or even a linear drain just outside) to direct stray moisture away.
Support & Bracing
- For wider panels, add stabilizer bars or support arms to prevent flexing or torque under impact (especially for shower partition glass panels in large dimensions).
- Bracing should be discreet and match the finish of the frame.
Weight & Handling
- Glass is heavy: e.g. 10 mm tempered weighs 25 kg per square meter (varies by manufacturer)
- Ensure installers have proper handling gear (suction cups, safety gloves, braces).
Compliance & Safety
- Ensure the panel meets applicable local safety codes / building regulations (often requiring tempered or toughened glass).
- Consider heat-soaked glass in climates with thermal stress, a stress test that helps weed out flawed units.
Design & Layout Strategies (When & Where to Use Fixed Panels)
Choosing the right layout for a stationary shower screen or fixed panel depends on your bathroom dimensions, plumbing, and user preferences.
Walk-In / Open Shower Layout
Often, one side features a single fixed glass panel (or two, forming an L-shape), leaving an open entry. The fixed panel is the walk-in shower fixed panel acting as a splash shield. Clean minimalism is a typical goal.
Partial Enclosure
A fixed panel can be paired with a swinging door or sliding door in a hybrid layout, the fixed portion handles splash, the door handles closure.
Niche or Alcove Enclosures
In an alcove (three-wall) setting, you might use a fixed panel in front of the opening, leaving one side open or completing it partially with a second panel. Use semi-framed fixed shower panels to reduce visual bulk.
Multi-Panel Configurations
While a single fixed panel captures many use cases, some layouts call for two or more fixed panels (e.g. U-shape, pentagon shapes). In those cases, treat each panel with proper sealing, alignment, and support.
Matching the Visual Style
- For small bathrooms, clear glass and minimal frames make the space feel larger.
- If privacy is a concern, frosted or etched glass may be better choices.
- Hardware finishes should tie into faucets, showerheads, and bathroom fixture style.
Installation – Step-by-Step Guide & Best Practices
Installing a fixed shower glass screen demands precision. Below is a high-level procedure with key tips and traps to avoid.
Step 1: Measure and Mark
Measure from multiple reference points (floor, ceiling, wall) to detect imperfections. Mark vertical lines using a plumb bob or level to guide frame installation.
Step 2: Prepare the Base & Substrate
Ensure the substrate is stable, flat, and waterproofed (tiles or waterproof board). If using a channel or profile, bed it on a thin bead of silicone and anchor it to the substrate.
Step 3: Attach Frame / Channel
Fix vertical and horizontal frame members (if fully framed) using screws and shims. Use leveling shims to guarantee perfect alignment before tightening.
Step 4: Insert Glass Panel
Carefully place the tempered glass into the frame/channel. Use rubber gaskets or clear silicone strips as spacers to protect edges. Leave minor clearance (2–3 mm) for thermal expansion if recommended by the glass supplier.
Step 5: Seal Joints
Apply neutral-cure silicone sealant along glass-to-frame edges, bottom-to-floor, and at intersections. Tool the bead so it’s smooth, compact, and has no air gaps.
Step 6: Add Support / Bracing
If needed, install a stabilizer bar or support arm across to a secure wall or ceiling anchor. Ensure the bar doesn’t strain the glass; allow slight flex tolerance.
Step 7: Cure & Test
Allow sealant to fully cure (often 24–48 hours) before wet use. Test with a water spray to check for leaks, especially around joints.
Maintenance, Troubleshooting & Long-Term Considerations
Cleaning & Care
- After each shower, use a squeegee or microfiber cloth to remove water.
- Monthly, use a mild, non-abrasive cleaner or diluted vinegar solution to remove mineral build-up.
- Avoid harsh acids, scouring pads, or overly alkaline cleaners, they will scratch or etch the glass.
Preventing Mold & Mildew
- Keep caulk and silicone joints intact and inspect them over time.
- Ensure good ventilation (exhaust fan or natural airflow) to reduce humidity retention.
Seal & Gasket Replacement
- Over time, seals or gaskets may degrade; replace them when they lose flexibility or crack.
- Re-silicone as needed, especially after structural shifts or leaks.
Common Issues & Fixes
| Issue | Likely Cause | Solution |
| Water leaks at the bottom | Sealant failed, insufficient slope | Re-seal, inspect slope direction |
| Glass edge discoloration | Hard water / soap scum | Deep clean, apply protective coating |
| Flexing / telling vibrations | Panel too wide without support | Add stabilizer bar |
| Sealant shrinkage / gaps | Temperature exposure, poor sealing | Re-seal with a compatible silicone |
| Misalignment over time | Building shifts or substrate movement | Loosen frame, relevel, retighten |
Trade-Offs & When a Fixed Panel Isn’t Ideal (A Reality Check)
While framed fixed glass shower panels have many merits, they also have limitations. As your intellectual sparring partner, I’ll challenge the assumption that fixed always equals best.
Reduced Flexibility
- Fixed panels struggle in small awkward bathrooms where you need a swinging or sliding door to fully enclose the shower and eliminate drafts.
- If you later want to switch to a different layout (say convert to tub-shower or relocate plumbing), fixed panels may become constraints.
Splash & Leakage Risk
- Because fixed panels don’t close like doors, splashing around the open side is possible. This is tolerable in “wet-room” layouts or properly sloped floors, but not ideal in all bathrooms.
- Without proper sealing or sloping, water might travel under the panel over time.
Visual Bulk from Frame
Some users might feel framed systems are visually heavier than frameless ones. In minimalist, high-end bathrooms, frameless often “reads” cleaner. Semi-framed or minimal-profile framed systems mitigate this, but there’s still a trade-off.
Maintenance & Replacement
If glass gets cracked or damaged, replacing a single fixed panel may require partial disassembly of frame components. Sealants and gaskets will wear; maintenance is non-optional.
Cost vs. Full Frameless Option
In premium bathrooms, clients sometimes choose full frameless for value perception despite higher cost. If budget is no object, frameless might win in aesthetics.
In short, fixed panels are excellent when your bathroom layout and user habits align with its strengths. But they are not a universal solution. Always evaluate constraints (space, budget, maintenance tolerance) before specifying.
Conclusion & Implementation Checklist
A framed fixed glass shower panel represents one of the most balanced choices in modern bathroom design, merging timeless elegance with functional durability. It’s not just a sheet of glass; it’s a deliberate architectural statement that divides wet and dry zones while maintaining openness and light.
Unlike traditional shower doors or curtains, a fixed glass shower panel offers the simplicity of use and low maintenance that busy homeowners appreciate. The metal frame provides strength and stability, ensuring long-term performance without compromising aesthetics. Whether you choose a semi-framed fixed shower panel for a subtle minimalist look or a fully framed fixed enclosure for added rigidity, both deliver dependable protection against splashes and humidity.