How to Put On a V Part Wig
V part wigs have become a favorite for beginners and experienced wig wearers alike because they are easy to install, glueless, and incredibly natural. Instead of dealing with lace, glue, or complicated melting techniques, you use your own hair at the part for a seamless, real‑scalp look. If you’ve ever struggled with lace fronts or simply want a faster routine, learning how to put on a V part wig will change the way you wear wigs.
This guide will walk you step‑by‑step through prepping your natural hair, installing the wig, blending your leave‑out, and styling for a flawless finish.
What Is a V Part Wig?
A V part wig has a V‑shaped opening at the top of the cap instead of lace. Through this opening, you leave out a small section of your own hair, which becomes the visible part and top layer. This gives you:
- Your real scalp at the part
- A very natural root and hairline area
- No lace to cut or melt
- Glueless installation in most cases
If you prefer a super realistic look but don’t want the work that comes with lace fronts, V part wigs are an excellent choice. They can be straight, kinky straight, curly, wavy, or any texture you like, and they are often quicker to apply than styles like a curly wig with bangs or other full‑coverage designs.
Step 1: Prep Your Natural Hair
The key to a great V part install is a flat, secure base and well‑planned leave‑out.
Decide Where You Want the Part
V part wigs allow for a middle or side part, depending on the design.
- For a classic, balanced look: choose a middle part.
- For a softer, face‑framing look: choose a side part.
Once you decide, section off the hair that will be left out for the part and a little extra around it. Clip this section away; you’ll blend it later.
Braid or Slick Down the Rest
- Braid the remaining hair into cornrows going straight back, or
- Create several flat braids or twists and pin them down to your scalp.
The goal is to make the base as flat as possible so the wig sits smoothly and naturally.
Put on a wig cap over your braids, leaving your part/leave‑out section accessible. You can either pull that section through a slit in the cap or put the cap slightly behind that area.
Step 2: Prep the V Part Wig
Before putting the wig on, spend a few minutes getting it ready.
Adjust the Cap
- Turn the wig inside out and locate the V‑shaped opening at the top.
- Find the combs around the V opening, as well as any combs at the sides and back.
- Adjust the straps at the back of the wig so it’s close to your head size. You can tighten more after it’s on.
Detangle and Lightly Style
- Gently detangle the hair from ends to roots using a wide‑tooth comb or appropriate wig brush.
- If the wig is kinky straight, straight, or body wave, comb through to smooth it.
- If it has curls or waves, use your fingers or a wide‑tooth comb to preserve the pattern.
This makes installation easier and helps you see how the hair naturally falls.
Step 3: Put On the V Part Wig
Now you’re ready to install.
- Hold the wig by the back with the V opening facing you.
- Position the opening so it frames your leave‑out section.
- Carefully place the wig on your head, sliding it back from your forehead toward the nape.
- Adjust the wig so the V opening sits exactly around your leave‑out area and the wig is centered.
Make sure the wig feels balanced on both sides and that the ear areas line up evenly.
Step 4: Secure the Wig (Glueless)
Most V part wigs are designed to be worn glueless, which is great for comfort and for protecting your edges.
- Use the combs around the V opening to anchor the wig into your braided base or wig cap.
- Secure the side and back combs as well to keep the wig from shifting.
- Adjust the elastic band or straps in the back so the fit is snug but not tight.
Shake your head gently to test how secure it feels. If it moves, tighten the straps or reposition the combs until the wig feels stable and comfortable.
Step 5: Blend Your Leave‑Out
Blending your natural hair with the V part wig is what makes the final look believable.
- Unclip your leave‑out and gently comb it.
- Style your leave‑out to match the texture of the wig:
- For straight or kinky straight wigs: use a flat iron or blow‑dryer with a brush (on a safe heat setting for your hair).
- For wavy or curly textures: use flexi‑rods, braids, or a curling wand (if heat is safe) to mimic the wig’s pattern.
- Lay your leave‑out over the V opening so it covers the wig tracks and blends into the wig hair.
- Use a small brush or comb to gently smooth and merge your hair with the wig, focusing on the roots and part.
You can also lightly lay your edges with gel or mousse if you like, keeping the look soft and not overly sculpted for a more natural effect.
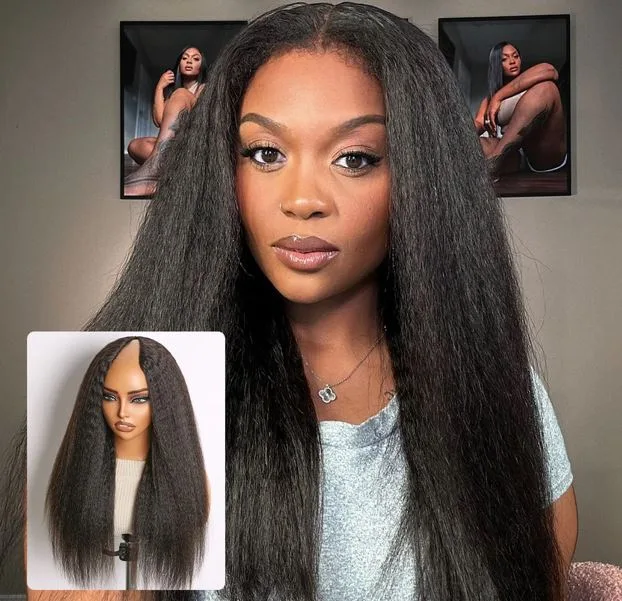
Featured Product: True Scalp Kinky Straight V Part Glueless Human Hair Wig
If you want a beginner‑friendly V part wig that already does a lot of the “natural look” work for you, consider this unit:
True Scalp Kinky Straight V Part Glueless Human Hair Wig – Flexi Fit & Drawstring
Here’s why it’s ideal for learning how to put on and style a V part wig:
True Scalp Effect
- The top area is designed to mimic real scalp, so when your leave‑out blends over the V opening, the overall effect is very realistic and “grown‑from‑the‑scalp” looking.
Kinky Straight Texture
- It looks like thick, healthy hair that’s been blown out, making it easy to blend with many naturally textured hair types that have been stretched or silk‑pressed.
Glueless, Flexi Fit & Drawstring
- The combs, flexible cap, and adjustable drawstring let you secure the wig without glue. That means quick installation and easy removal, perfect for everyday wear or beginners who don’t want to deal with adhesives.
Versatile Styling
- You can wear it straight, curled at the ends, or in soft waves, and still enjoy the natural root look thanks to the V part design.
For anyone new to V part wigs, this kind of construction makes the process smoother and more forgiving.
Step 6: Style the Wig
Once your V part wig is installed and blended, you can style it just like your own hair (for human hair units).
- Use a heat protectant before using hot tools.
- Flat iron in small sections for a sleek look.
- Curl with a curling iron or wand for body and volume.
- Brush out curls for soft, glamorous waves.
Avoid heavy products at the roots, as they can make the hair look greasy or weigh down your leave‑out.
Step 7: Daily Care and Removal
One of the best things about V part wigs is how easy they are to take off and re‑install.
At the end of the day:
- Gently remove any bobby pins if you added extra security.
- Unclip the combs around the V opening, then the side and back combs.
- Loosen any adjustable straps or drawstring.
- Lift the wig off carefully from back to front.
Store your wig on a wig stand or mannequin head to maintain its shape. Wrap your own hair at night or keep it in your braids, and re‑install the wig in the morning as needed.
Final Thoughts
Learning how to put on a V part wig is straightforward once you break it down: prep your hair, position the opening around your leave‑out, secure the cap, and blend. Compared with lace front methods or styles like a no lace wet and wavy wig that fully cover your hairline, V part units give you the advantage of showing your real roots and scalp, which looks incredibly natural. With a bit of practice and a good beginner‑friendly piece, you can enjoy quick installs, comfortable wear, and a flawless, realistic finish every time.