How to Build a Professional Monitor Rig for Your Sony A7IV
The Sony A7IV stands as one of the most capable hybrid cameras available today, delivering exceptional image quality and video performance that rivals cameras costing significantly more. Yet despite its impressive sensor and processing power, the camera body alone falls short of meeting the demands of professional production environments. The compact design that makes it portable also means limited mounting points, vulnerable exposed surfaces, and no integrated way to attach the essential tools that modern creators rely on—external monitors, microphones, lights, and stabilization accessories. This gap between the camera’s technical capabilities and real-world workflow requirements can slow down shoots and leave expensive gear at risk. The solution lies in building a purpose-designed monitor rig around a dedicated Sony A7IV cage, transforming the camera into a protected, expandable workstation. This guide walks you through the entire process, from understanding why a cage matters to selecting the right components and assembling a complete rig that delivers both protection and professional versatility for any shooting scenario.
Why Your Sony A7IV Needs a Professional Camera Cage
A camera cage serves a dual purpose that extends far beyond simply creating more attachment points for accessories. The first and most critical function is physical protection. The Sony A7IV represents a substantial investment, and its magnesium alloy body, while robust, remains vulnerable to the inevitable impacts and wear that occur during active production work. A properly fitted cage creates a protective exoskeleton around the camera, absorbing shocks from accidental bumps against doorframes, light stands, or hard surfaces during transport. The raised frame keeps the camera body elevated when set down, preventing scratches to the finish and protecting protruding elements like the electronic viewfinder and hot shoe from direct contact damage.

The second essential function addresses workflow efficiency through expanded mounting capability. The A7IV’s limited built-in mounting options—primarily the hot shoe and tripod socket—create bottlenecks when you need to attach multiple tools simultaneously. A dedicated cage transforms the camera into a modular platform, featuring strategically placed 1/4″-20 threads for lightweight accessories and 3/8″ threads for heavier components like articulating arms and top handles. These standardized mounting points allow you to position monitors at optimal viewing angles, attach microphones away from the lens axis to reduce handling noise, and mount LED panels exactly where light is needed.
What distinguishes a purpose-built Sony A7IV cage from generic alternatives is precision engineering tailored to this specific camera body. Custom-fitted cages maintain full access to every port, button, and the battery compartment without requiring disassembly, while generic options often block critical controls or force compromises. The tailored design ensures mounting points align with the camera’s center of gravity, maintaining balance even when accessories are attached, and the cage integrates seamlessly with Sony’s menu system and grip ergonomics rather than fighting against them.
Core Components: Building the Foundation of Your Monitor Rig
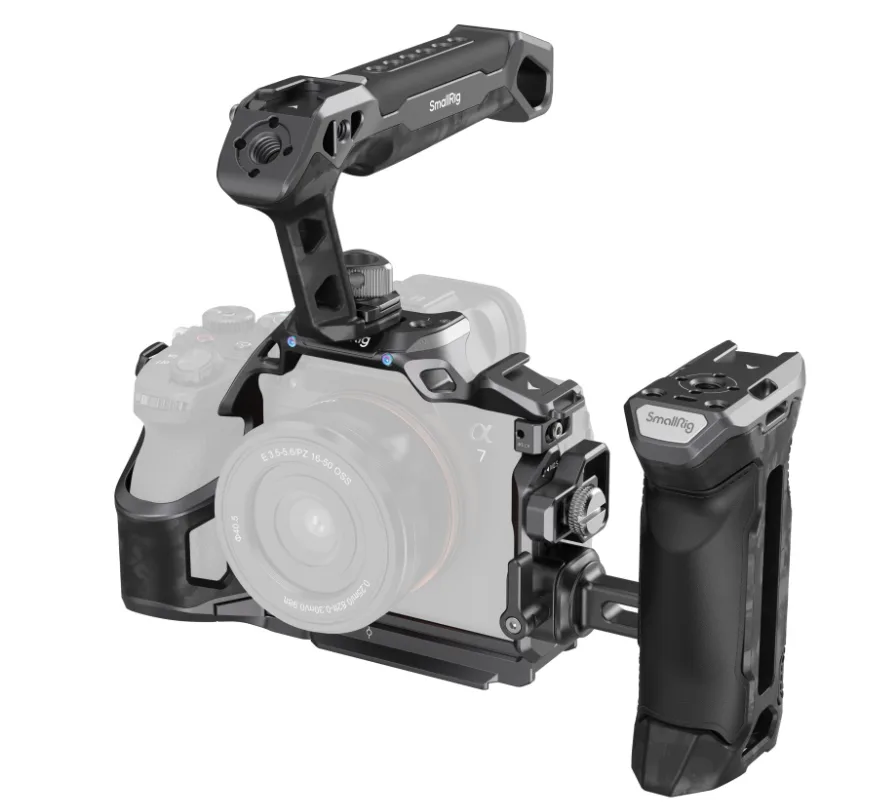
Building a functional monitor rig requires four essential hardware categories that work together as an integrated system. At the center sits the Sony A7IV cage itself, which serves as the structural foundation for everything else. Quality cages are machined from aircraft-grade aluminum or lightweight magnesium alloys, offering a balance between protective strength and manageable weight that won’t fatigue your arms during extended handheld shooting. The cage design should feature multiple threaded mounting points distributed across the top, sides, and rear surfaces, providing flexibility for different accessory placements.
The second critical component is the mounting interface system that connects accessories to the cage. NATO rails have become the professional standard, offering tool-free quick-release functionality that lets you attach and remove components in seconds without fumbling with screws. These rails lock accessories in place with spring-loaded clamps that won’t loosen during movement, yet release instantly when needed. For monitor attachment specifically, you’ll need an articulating arm—either a ball-head style that adjusts with a single locking knob, or a multi-joint arm that provides more precise positioning control. The arm creates the crucial link between cage and monitor, determining viewing angle flexibility.
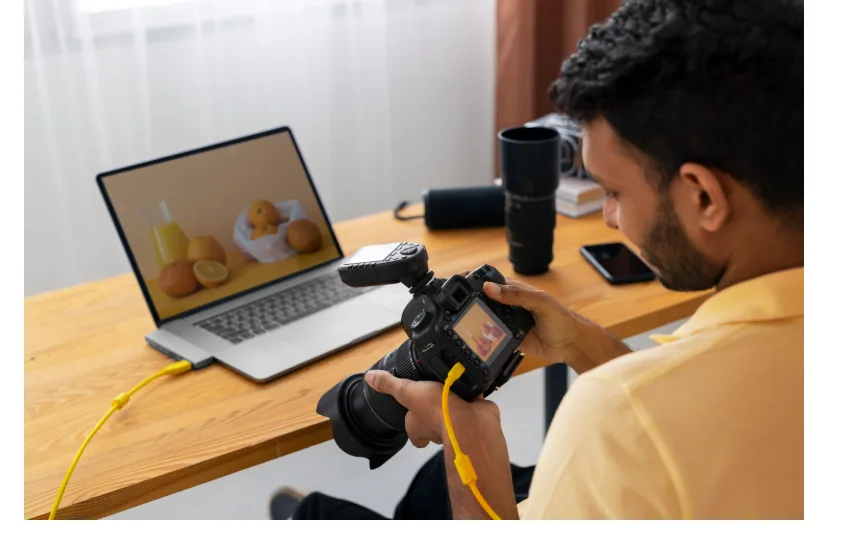
The external monitor itself represents the most visible component of your rig. Professional field monitors range from compact five-inch screens suitable for solo work to seven-inch displays better suited for client monitoring or focus pulling. Brightness capability matters significantly—look for at least 1000 nits for outdoor visibility. Input options should match your camera’s output, with HDMI being standard for the A7IV, though some monitors add SDI connectivity for professional workflows. Finally, don’t overlook the small hardware that holds everything together: properly sized hex keys, spare mounting screws in both 1/4″-20 and 3/8″ sizes, and cable ties or velcro straps for managing the inevitable tangle of cables that connects these components into a working system.
Selecting the Perfect Sony A7IV Cage
The material choice between aluminum and magnesium alloy cages involves trade-offs between cost and performance. Aluminum cages offer excellent durability at accessible price points, with anodized finishes that resist scratching and provide a professional appearance. Magnesium alloy alternatives reduce weight by approximately thirty percent while maintaining comparable strength, though at a premium cost that makes sense primarily for operators who shoot handheld for extended periods. Beyond materials, examine the cage’s port access design carefully—the best options provide full access to the battery compartment, memory card slots, and all connection ports without any disassembly required. Look for cages that include integrated cold shoe mounts on the top surface for wireless receivers or compact lights, and verify that the base plate doesn’t obstruct the camera’s tripod socket. Manufacturers like SmallRig have developed model-specific cages for the A7IV that incorporate built-in top handles with additional mounting points, consolidating two accessories into one component and improving weight distribution for handheld work.
Step-by-Step Assembly: Constructing Your Professional Monitor Rig
Begin by securing the cage to your Sony A7IV body. Remove any existing base plates or L-brackets from the camera’s tripod socket. Align the cage’s base plate with the camera body, ensuring the lens mount opening sits centered and all port cutouts match their corresponding access points. Thread the main locking screw through the base plate into the tripod socket, tightening it firmly by hand first, then giving it a final quarter-turn with the appropriate hex key. Avoid overtightening, which can strip threads or stress the camera body—the cage should sit snug without any wobble, but shouldn’t require excessive force to secure.
Next, attach your NATO rail or rod mounting system to the cage’s top surface. NATO rails typically slide into dedicated slots on premium cages and lock with a spring-loaded lever, requiring no tools. Position the rail toward the side opposite your dominant hand to keep the monitor out of your primary sightline. If using a 15mm rod system instead, thread the rod clamps into the cage’s 3/8″ mounting holes, ensuring the rods run parallel to the camera body. Tighten these connections thoroughly, as they’ll bear the monitor’s weight during movement.
Mount the articulating arm to your rail system, positioning it where the monitor will sit at a comfortable viewing angle without blocking your access to camera controls. Attach the monitor to the arm’s mounting plate using the provided screws, typically 1/4″-20 threads. Before fully tightening, power on both camera and monitor to verify the screen position works for your shooting stance. Adjust the arm’s joints to position the monitor where you can see it clearly without straining your neck, then lock all adjustment points securely. Check that the added weight hasn’t shifted the rig’s balance—if it feels front-heavy, consider repositioning the monitor closer to the camera body or adding a counterweight to the rear.
Connect your HDMI cable from the A7IV’s output port to the monitor’s input, routing the cable along the cage’s frame to prevent it from hanging loose. Use velcro cable ties or rubber bands to secure the cable at multiple points, leaving slight slack near the camera end to prevent stress on the port during handling. Configure the monitor’s input settings and adjust the A7IV’s HDMI output preferences in the camera menu to disable display overlays if you want a clean feed. Finally, perform a shake test—gently move the entire rig through typical shooting motions to identify any loose connections or rattling components, then tighten those specific points until everything moves as one solid unit.
Advanced Configurations and Essential Camera Accessories
The basic monitor rig establishes your foundation, but the cage’s true value emerges when you configure it for specific shooting demands. For handheld documentary work or run-and-gun scenarios, adding a top handle transforms stability and control. The handle mounts to the cage’s top surface using 3/8″ threads, positioning your grip above the camera’s center of gravity for balanced weight distribution during extended shoots. Premium handles include additional NATO rails or cold shoes along their length, creating secondary mounting real estate for wireless audio receivers or compact LED panels.
Audio capture requires dedicated attention in professional work. A shotgun microphone mounted via a cold shoe adapter on the cage’s top rail positions the capsule above the lens axis, reducing handling noise while maintaining directional pickup toward your subject. The cage’s multiple mounting points let you position the microphone away from the monitor to prevent physical interference. For interview setups, an articulating arm attached to the cage’s side threads can hold a compact LED panel, providing fill light that moves with the camera while keeping your subject properly illuminated. More advanced configurations incorporate follow focus systems using 15mm rod mounts attached to the cage’s front, with the focus wheel positioned for comfortable operation while monitoring through your external screen. Each accessory connects through the cage’s standardized mounting infrastructure, allowing you to reconfigure the entire rig in minutes as shooting requirements change throughout your production day.
Building Your Complete Sony A7IV Monitor Rig
A dedicated Sony A7IV cage transforms your camera from a capable standalone tool into a fully integrated professional workstation. This foundation provides the dual benefits of physical protection for your investment and the expanded mounting infrastructure that modern production workflows demand. By following the component selection process—choosing a properly fitted cage, selecting compatible mounting hardware, and pairing it with an appropriate external monitor—you create a system tailored to your specific shooting requirements. The assembly steps outlined here ensure secure connections and proper weight distribution, while the advanced configuration options demonstrate how the cage serves as a central hub for microphones, lights, handles, and focus systems. The result is a versatile rig that adapts to documentary run-and-gun work, controlled interview setups, or narrative productions without requiring complete rebuilds between projects. Beyond the immediate functional improvements, this investment protects your Sony A7IV from the wear and damage that inevitably occurs during active shooting, extending the camera’s working life and maintaining its resale value. With your completed monitor rig, you’ve built a professional tool that matches the A7IV’s technical capabilities with the practical infrastructure needed to deliver consistent results across any filming scenario.