Unlock Hidden Spaces with a Versatile Borescope
Picture this: you’re standing in your basement, staring at a wall where a mysterious dripping sound has persisted for weeks. You know there’s a pipe behind that drywall, but short of tearing open the entire wall, you have no way to see what’s happening inside. This frustrating scenario plays out in homes everywhere—hidden cavities, cramped engine compartments, and narrow pipe openings remain stubbornly out of sight during critical inspections. Enter the borescope, a compact inspection tool that’s transforming how DIY enthusiasts tackle home repairs and diagnostics. Sometimes called an endoscope or flexible probe camera, this device lets you peer into spaces your eyes could never reach on their own. Whether you’re tracking down a plumbing leak, checking wiring behind walls, or examining engine internals, a borescope turns guesswork into confident diagnosis. This article will walk you through everything you need to know about choosing, using, and maintaining a borescope so you can unlock those hidden spaces and take control of your next inspection project.
What is a Borescope? The DIY Enthusiast’s Essential Inspection Tool
A borescope is a visual inspection instrument designed to illuminate and examine areas that would otherwise remain invisible without disassembly or destruction. Closely related to medical endoscopes, the borescope adapts the same core technology for industrial and household use, giving everyday users professional-grade diagnostic capability. The device consists of three primary components: a miniature camera mounted on the tip of a flexible or semi-rigid probe, integrated LED lights for illumination, and a display screen or smartphone connection for real-time viewing. The flexible probe—typically ranging from a few feet to several meters in length—can snake through tight openings, around corners, and into confined cavities where direct line-of-sight is impossible. For DIY enthusiasts who regularly face unknown conditions behind walls, under floors, or inside mechanical assemblies, owning a borescope eliminates costly exploratory demolition and unnecessary mechanic visits. Instead of guessing whether a pipe joint has corroded or whether rodents have chewed through insulation, you feed the probe into the space and see the answer immediately on screen. This versatile inspection camera bridges the gap between professional contractors with specialized equipment and homeowners who need reliable visual confirmation before committing to repairs. It’s the kind of tool that, once you’ve used it, you’ll wonder how you ever managed without.
Key Features to Look for in an Affordable, High-Quality Borescope
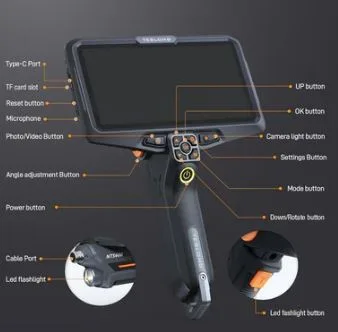
Not all borescopes are created equal, and understanding which features matter most will help you invest wisely without overspending. Camera resolution sits at the top of the priority list—look for at least 720p HD capability, though 1080p models have become increasingly accessible and deliver noticeably sharper images when identifying hairline cracks or small corrosion spots. A blurry image defeats the entire purpose of the tool, so don’t compromise here.
Probe length and diameter determine where you can actually reach. For most household tasks, a probe between three and five meters handles wall cavities, HVAC ducts, and automotive inspections comfortably. Thinner probes (5.5mm or less) fit into tighter openings like drain pipes and spark plug holes, while 8mm probes offer better image stability in larger spaces. Flexibility matters too—a semi-rigid cable holds its shape when you need to push through horizontal runs, while a fully articulating tip lets you look around corners without repositioning.
Integrated LED lighting with adjustable brightness prevents overexposure on reflective surfaces like metal pipes while still illuminating dark cavities adequately. For connectivity, USB models work well with laptops, but Wi-Fi-enabled borescopes that stream directly to your smartphone offer superior portability on job sites. Brands like Teslong have made these features increasingly accessible to home users, offering a range of probe diameters and connectivity options suited to various inspection needs. Waterproof ratings of IP67 or higher are essential if you plan to inspect plumbing or work in damp environments. Finally, consider build quality—a reinforced cable junction where the probe meets the handle is where cheaper models typically fail first. Spending slightly more on a durable connection point saves you from replacing the entire unit after a few months of regular use.
Practical Applications: Using a Borescope to Master Hard-to-Reach Areas
The true value of a borescope reveals itself the moment you face a real-world problem that would otherwise require expensive professional help or destructive exploration. In plumbing, homeowners routinely use flexible probes to investigate slow drains, feeding the camera through cleanout ports to spot grease buildup, root intrusion, or collapsed pipe sections without excavating the yard. One weekend warrior discovered a hairline crack in a cast iron elbow joint behind a finished basement wall—a find that saved thousands in potential water damage because it was caught before the leak worsened.
Electrical work presents another compelling use case. Before drilling into a wall to run new cable, inserting a borescope through a small pilot hole reveals existing wiring paths, fire blocks, and potential obstacles. This simple precaution prevents accidentally severing live wires or puncturing hidden plumbing lines. For automotive enthusiasts, the borescope has become indispensable for examining cylinder walls, valve seats, and intake manifolds without pulling the engine apart. Mechanics and hobbyists alike use it to verify carbon buildup or score marks that indicate wear, making informed decisions about whether a top-end rebuild is truly necessary.
Beyond these primary applications, borescopes prove useful for inspecting HVAC ductwork for mold or debris accumulation, examining gutters and downspouts from ground level, checking inside wall cavities for pest activity, and verifying insulation coverage in hard-to-reach attic spaces. The flexible probe adapts to virtually any confined environment, turning each inspection into a straightforward visual task rather than an expensive guessing game.
Step-by-Step Solutions: How to Conduct Effective Borescope Inspections
Knowing you own a capable inspection tool is one thing—using it effectively requires a methodical approach tailored to each specific task. The following subsections break down the most common DIY inspection scenarios into clear, actionable steps that maximize your borescope’s potential while keeping you and your home safe.
Subsection: Inspecting Plumbing Systems
Start by selecting the appropriate probe diameter for your pipe size and attaching any hook or mirror accessories that came with your unit. Clean the camera lens with a microfiber cloth, then power on the device and adjust LED brightness to a medium setting. Insert the probe slowly through a cleanout port or drain opening, advancing at a steady pace while watching the screen for obstructions, corrosion, or joint separations. When you spot an issue, capture a photo or video for reference. Mark the approximate probe length inserted so you can locate the problem from the exterior. After inspection, withdraw the probe gently to avoid snagging, and rinse it with clean water if it contacted sewage or debris.
Subsection: Checking Electrical Wiring
Safety comes first—always shut off the circuit breaker for the area you’re inspecting and verify with a non-contact voltage tester that no live current is present. Drill a small pilot hole or use an existing opening like an outlet box knockout to feed the probe into the wall cavity. Navigate slowly, scanning for damaged insulation, scorch marks, rodent-chewed sheathing, or improperly secured connections. Avoid forcing the probe past resistance, as you could dislodge existing wires. Document any concerns with screenshots before sealing the access point and restoring power only after confirming safe conditions.
Subsection: Automotive Diagnostics
Allow the engine to cool completely before beginning any internal inspection. Remove the spark plug or access port relevant to the cylinder or component you need to examine, then insert the borescope probe carefully to avoid scratching machined surfaces. Rotate the crankshaft by hand if you need to view different portions of the cylinder wall or piston crown. Look for scoring, carbon deposits, valve seat pitting, or coolant residue that might indicate a head gasket issue. Record video as you rotate through the inspection area so you can review findings later or share them with a mechanic for a second opinion before committing to disassembly.
Maintenance and Best Practices for Long-Lasting Borescope Use
Protecting your investment requires consistent care after every use. Wipe the probe and camera lens with a soft microfiber cloth immediately after each inspection, paying special attention to any residue from pipes or engine compartments. For probes exposed to moisture, dry them thoroughly before coiling to prevent corrosion on electrical contacts. Store the borescope in its protective case with the probe loosely coiled—tight bends stress the internal wiring and degrade image quality over time. Periodically check the cable junction near the handle for any signs of fraying or looseness, and test LED brightness and camera focus before heading into a job. These simple habits keep your inspection camera performing reliably for years, ensuring that every dollar spent continues delivering value across countless DIY projects.
Empower Your DIY Inspections with the Right Borescope
A borescope transforms the way DIY enthusiasts approach home repairs, automotive diagnostics, and routine maintenance by eliminating the uncertainty that comes with hidden spaces. Throughout this guide, we’ve explored how this versatile inspection tool—combining a miniature camera, flexible probe, and integrated lighting—delivers professional-level visibility into areas that would otherwise demand costly professional visits or destructive exploration. The key to a smart purchase lies in prioritizing features that match your specific needs: adequate resolution for clear diagnosis, appropriate probe length and diameter for your most common tasks, reliable waterproofing, and durable construction at the cable junction. From tracing plumbing problems to verifying electrical safety and diagnosing engine wear, the practical applications extend far beyond any single project. By following methodical inspection procedures and maintaining your tool with consistent cleaning and proper storage, you ensure years of dependable service from a single investment. Technology has a way of shifting power back into the hands of those willing to learn, and the borescope is a perfect example—an affordable, high-quality solution that empowers you to see what was previously hidden, make informed decisions, and tackle repairs with the confidence that comes from knowing exactly what you’re dealing with before you pick up a wrench or saw.