How to Recover Deleted Files After Emptying Recycle Bin for Free
Emptied the Recycle Bin? Your Files May Still Be Recoverable
You empty the Recycle Bin, then realize you deleted an important file. Before you break a sweat, you might be able to recover deleted files after emptying the Recycle Bin. When you empty the Recycle Bin, Windows removes the file’s visible entry and marks its disk space as available. The data can remain until new files overwrite it. That’s why you should act quickly.
Stop saving, downloading, or installing anything on the affected drive. The sections beneath explain where your files went, how to check for backups, and what to do if no backup exists, all in the order that gives you the best chance of recovery.
Key Takeaways
- If you’ve emptied the Recycle Bin, act quickly and stop using the affected drive to prevent overwriting.
- Check the Recycle Bin, OneDrive Recycle Bin, and File History.
- If no backup exists, try data recovery software and save recovered files to a different drive.
- Recovery isn’t guaranteed, especially on SSDs using TRIM or when deleted data has been overwritten.
- Prevent future loss with File History, regular external backups, OneDrive syncing, and a quick Recycle Bin check before emptying it.
Part 1: Where Do Files Go After the Recycle Bin Is Emptied?
Think of a file as two things. A record showing where it exists and the data itself. Emptying the Recycle Bin removes the record, while the data may remain until Windows overwrites the space. Recovery software looks for this leftover data.
So “emptied” doesn’t always mean “gone.” It means the space is now available for reuse. But some deletions bypass the Recycle Bin entirely:
- Shift + Delete deletes immediately.
- Files too large for the bin may be permanently deleted.
- USB drives and SD cards generally don’t use the PC’s Recycle Bin.
- Command-line commands such as del and Remove-Item bypass it.
Note: Also, check “Storage Sense” in Windows 11. It can automatically delete Recycle Bin items after a set number of days under “Settings > System > Storage.”
Part 2: Choose the Best Recovery Method
Don’t start with software if a simpler option exists. Match your situation to the table and move from top to bottom. The first three rows cost nothing and carry no risk to your data, so exhaust them before scanning the drive:
| Situation | Recommended Solution |
| File is still in the Recycle Bin | Right-click it and select Restore |
| File was synchronized with OneDrive | Check the OneDrive Recycle Bin |
| File History was enabled | Restore an earlier version |
| Recycle Bin was emptied | Scan with 4DDiG Data Recovery |
| User prefers a Microsoft tool | Try Windows File Recovery |
| Drive is physically damaged | Use a professional recovery service |
Part 3: Check Recycle Bin, OneDrive, and File History
Here are 3 ways to try out for recovering files after emptying the Recycle Bin before you proceed to using a data recovery software:
Method 1: Look in the Recycle Bin first
If you only emptied the Recycle Bin partially or deleted something after the last time you emptied it, the file may still be there. So, check there:
- Open the “Recycle Bin.” Search by file name or extension, or switch to “Details” and sort by “Date Deleted” or “Original Location.”
- Once you find the file, right-click it and select “Restore.” Windows will return it to its original folder.
Method 2: Check OneDrive, which has its own separate bin
In case the file was in a OneDrive-synced folder such as Desktop, Documents, or Pictures, check the OneDrive Recycle Bin separately. Emptying Windows’ Recycle Bin doesn’t affect it:
- Sign in at “OneDrive.com” and select “Recycle Bin.”
- Check your deleted files.
Personal accounts keep deleted items for up to 30 days, while work or school accounts typically keep them for 93 days unless an administrator changes that setting. Cloud or online-only files may appear only in OneDrive’s web Recycle Bin.
Method 3: Try File History and Previous Versions
If File History was enabled before deletion, you may be able to restore an earlier version of your files. Here’s how:
- Right-click the folder that contained the deleted file. Then, choose “Show more options.”
- Tap “Restore previous versions.” Select a version from before the deletion.
- You can also open “File History” in “Control Panel” and select “Restore personal files to browse backups.”
Note: File History only works if it was set up before the file was deleted. If it wasn’t enabled, move on to Part 4.
Part 4: Recover Emptied Recycle Bin Files with 4DDiG
When you have no backup to fall back on, you need software that can find data the file system no longer lists. 4DDiG Free Data Recovery supports several data loss scenarios, including emptied Recycle Bin, formatted drives, lost partitions, and RAW file systems. Photos are a frequent casualty of an emptied bin. But 4DDiG Data Recovery also acts as free photo recovery software, supporting JPG, PNG, RAW, and other image formats.
Main Features of 4DDiG Data Recovery:
- It supports Windows 11, 10, 8.1, 8, and 7, as well as NTFS, FAT32, FAT16, and exFAT.
- It’s compatible with 2,000+ file types, including photos, videos, audio, documents, etc.
- Offers selective file recovery and a free preview to check the retrieved files.
- Compatible with both internal and external devices like HDDs, SSDs, SD cards, USBs, drones, digital cameras, etc.
- Free software to recover deleted files from Recycle Bin, up to 2 GB free of cost.
Important Note: No recovery tool guarantees success. If new data has overwritten the file’s space, you can’t recover it. Results depend on how quickly you act, the drive’s condition, and whether the deleted data has been overwritten. Stop using the drive and treat the scan as an attempt, not a guarantee.
Step-By-Step Guide Using 4DDiG Data Recovery:
Here’s how to recover deleted files after emptying the Recycle Bin for free with 4DDiG Data Recovery:
Step 1: Download and install:
Download, install, and execute 4DDiG Data Recovery on your computer.
Step 2: Pick a location:
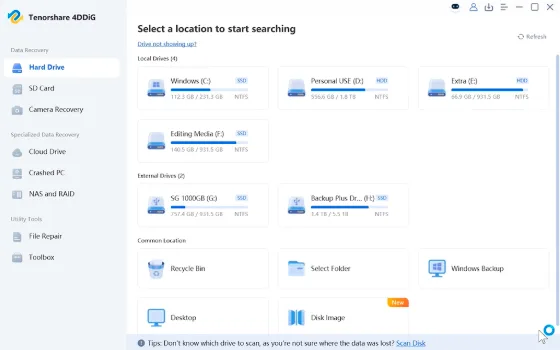
Choose the folder, drive, external device, or partition you want to scan.
Step 3: Start the scan:
Choose the file types to scan and start the scan. It may take a few minutes for small drives or significantly longer for large or heavily fragmented ones. Results appear in real time.
Step 4: Preview and Recover
Filter by file type, search by name, preview files, and then retrieve the ones you need. Save recovered files to a different drive to avoid overwriting recoverable data.
Part 5: Use Windows File Recovery
If you’d rather stay with Microsoft, Windows File Recovery is a free command-line app from the Microsoft Store. It functions on internal, external, and USB drives, but has no graphical interface. Here’s how it works:
Basic syntax:
winfr source-drive: destination-drive: [/mode] [/switches]
Example:
winfr C: E: /extensive /n \Users\Username\Documents\
Here, C: is the source, E: is the recovery destination, and /n specifies the folder or file to search. Replace “Username” with your Windows username. Run the app as administrator and type Y when prompted. The source and destination must be different drives.
You can also pick between “Regular” and “Extensive” modes:
- Regular: Recently deleted files on healthy NTFS drives.
- Extensive: Older deletions, formatted or corrupted drives, and FAT/exFAT systems.
Start with “Regular” and switch to “Extensive” if needed. For an emptied Recycle Bin, “Extensive” mode is a good choice, though it takes longer. Windows File Recovery also can’t guarantee recovery on modern SSDs.
Part 6: Improve Your Chances of Recovery
You can actually improve your chances of Recycle Bin recovery on Windows 11/10. Here’s how:
- Don’t format the drive. It can overwrite recovery data.
- Don’t run cleanup software. It may delete the leftover recovery tools needed.
- Don’t defragment. It can move or overwrite deleted data.
- Never recover files to the same drive. Always use a separate destination.
SSDs are tougher
SSDs use TRIM to mark deleted blocks for cleanup. Once those blocks are cleared, no software can recover the data. Stop using the PC as soon as possible. Recovery is still worth trying, but results may be less complete than with hard drives.
When to call a professional
Stop using the drive if it clicks, grinds, disconnects repeatedly, or doesn’t appear in Windows or BIOS. Scanning a failing drive can worsen the damage. In these cases, a professional data recovery service is the safer option.
Part 7: Prevent Future File Loss
Once you recover deleted files after emptying Recycle Bin, prevent the loss from happening again. Here’s how
- Turn on “File History” in the “Control Panel” and use an external drive.
- Back up important folders regularly and keep one copy off the PC.
- Configure OneDrive properly. Make sure Desktop, Documents, and Pictures are syncing and up to date.
- Check before emptying the Recycle Bin. Sort by Date Deleted and take a quick look before clicking Empty.
Final Words
When you’ve lost your files, the safest approach is to stop using the drive, then check the Recycle Bin, OneDrive, and File History for a restore. If no backup exists, recover deleted files after emptying Recycle Bin with 4DDiG Free Data Recovery and save them to a different drive. If needed, try Windows File Recovery as a second option. Once you’re done, check your backups so you won’t need recovery next time.
FAQs
-
Can I recover files after emptying the Recycle Bin?
Possibly. The files may remain recoverable until their storage space is overwritten. Stop using the affected drive and begin recovery promptly.
-
How can I recover deleted Recycle Bin files without a backup?
Use a recovery program such as 4DDiG Data Recovery or Microsoft’s Windows File Recovery. Save recovered files to a different drive.
-
Is free Recycle Bin recovery software safe?
Yes. It can be safe if you download it from an official website. Avoid unknown tools, do not install software on the affected drive, and review the program’s privacy policy.
-
Can I recover permanently deleted photos for free?
Yes. 4DDiG free photo recovery software can scan a detectable drive for deleted images. Recovery success depends on whether the original photo data has been overwritten.
-
Why can’t I find my deleted file in the Recycle Bin?
The file may have been “Shift-deleted” or removed from a removable drive. It may be too large for the Recycle Bin, be deleted by an application, or be stored in a separate cloud Recycle Bin.