A Guide to Using Camera Bag Hooks for Enhanced Tripod Performance
You’ve scouted the perfect location, your talent is ready, and the light is fading fast. You hit record, only to review the footage later and discover subtle vibrations ruining every frame. For videographers working in field production, tripod instability is more than an annoyance—it’s a credibility killer. Wind gusts, soft ground, and the sheer weight of professional camera rigs conspire against smooth, broadcast-quality shots. Yet there’s a remarkably simple accessory that many professionals overlook: the camera bag hook. By leveraging the gear you’re already carrying, these small but mighty hooks can dramatically improve your tripod’s grounding and resistance to movement. This guide is designed for professional videographers who demand rock-solid stability on every shoot. We’ll walk through exactly how camera bag hooks work, provide a step-by-step process for using them effectively in the field, and share essential tripod maintenance practices that keep your setup performing at its best over the long haul. Whether you’re battling coastal winds or navigating rocky terrain, the strategies ahead will help you capture cleaner footage with confidence.
The Importance of Tripod Stability in Video Field Production
A video tripod is only as good as its ability to remain perfectly still during a take. In field production, where controlled studio conditions don’t exist, achieving that stillness becomes a genuine technical challenge. Outdoor shoots expose your rig to wind—sometimes constant, sometimes in unpredictable gusts—that can introduce micro-vibrations invisible to the naked eye but glaringly obvious on a 4K monitor. Uneven terrain compounds the problem; setting up on grass, gravel, or sand means your tripod legs may shift or slowly sink mid-shot. Then there’s the weight factor. Professional camera packages with external monitors, wireless transmitters, and cine lenses create top-heavy rigs that amplify every disturbance from the ground up. Even foot traffic nearby can translate through the ground into your footage. The reality is that a tripod’s factory stability rating assumes ideal conditions that rarely exist on location. This gap between lab performance and real-world demands is precisely where accessories become essential. Rather than upgrading to heavier, more expensive support systems, videographers can dramatically improve their existing tripod’s grounding with simple, targeted additions—starting with one of the most practical and portable options available.
How Instability Affects Your Final Video Output
The consequences of an unstable tripod extend far beyond a slightly shaky frame. During slow pans or tilts, even minor vibrations create a jittery motion that no amount of post-production stabilization can fully correct—software fixes often introduce warping artifacts or crop your carefully composed frame. Telephoto shots magnify the problem exponentially; a barely perceptible wobble at the tripod becomes a nauseating sway at 200mm. For client-facing work, this directly impacts your professional credibility. Producers and directors notice instability immediately, and it signals a lack of technical control that can cost you future bookings. Interview footage with subtle frame movement distracts viewers from the subject’s words, while product shots lose their polished commercial feel. The most frustrating part is that these issues often only become apparent during editing, long after the shoot has wrapped and reshoots are impractical or impossible. Taking proactive measures to secure your tripod before rolling isn’t perfectionism—it’s a fundamental professional practice that separates broadcast-quality output from amateur work.
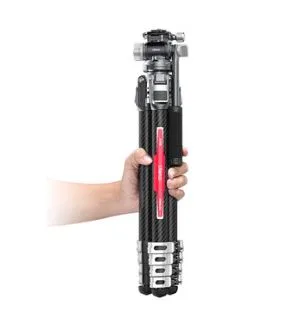
Understanding Camera Bag Hooks: What They Are and How They Work
A camera bag hook is a small, lightweight accessory designed to hang from your tripod’s center column, providing a convenient attachment point for suspending additional weight—typically your camera bag or gear case. The concept is rooted in basic physics: adding downward force to your tripod’s center of gravity lowers it and increases the overall mass pressing into the ground, making the entire setup far more resistant to lateral forces like wind or accidental bumps. Most hooks feature a carabiner or loop at the top that clips or threads onto the center column’s bottom hook or spreader junction, with a sturdy hanging mechanism below that supports bags weighing anywhere from ten to forty pounds. What makes this accessory particularly appealing for field videographers is that it requires no extra ballast to carry. You’re repurposing the weight of gear already in your kit—lenses, batteries, accessories—turning dead weight sitting on the ground into an active stabilization tool. The portability factor is unmatched; a quality camera bag hook weighs just a few ounces and fits in a pocket, yet it can transform a lightweight travel tripod into a significantly more planted support system. It’s also one of the most cost-effective stability upgrades available, delivering measurable performance gains without requiring investment in heavier tripod systems.
Types of Camera Bag Hooks and Compatibility with Tripods
Camera bag hooks come in several designs, each suited to different tripod configurations. Clip-on hooks use a spring-loaded carabiner that snaps directly onto a center column’s existing hook or the lower brace of a tripod spreader—these are the fastest to deploy and work well with tripods that already have a built-in attachment point. Screw-in models thread into the 1/4″-20 or 3/8″-16 mounting hole found at the bottom of many center columns, offering a more secure and rattle-free connection ideal for long takes where any movement is unacceptable. Strap-style hooks wrap around the center column with a Velcro or buckle closure, making them universally compatible with virtually any tripod, including those without dedicated hook points. Brands like Ulanzi offer compact, well-engineered hook options that accommodate various tripod designs while keeping overall kit weight minimal. When selecting a hook, first check your tripod’s center column—look for a removable end cap (which often conceals a threaded hole) or an integrated hook. Heavier-duty fluid head tripods commonly used in video production almost always include one of these features. Match the hook’s weight rating to the heaviest bag you plan to suspend, and ensure the hanging mechanism allows the bag to swing freely without contacting the tripod legs, which would transfer vibrations rather than dampen them.
Step-by-Step Guide to Using Camera Bag Hooks for Enhanced Tripod Performance
Getting the most out of a camera bag hook requires more than just clipping it on and hoping for the best. A deliberate approach ensures you’re actually improving stability rather than introducing new problems. Start by assessing your tripod’s center column for a compatible attachment point—unscrew the end cap if present to reveal a threaded hole, or locate the built-in hook beneath the column. If your tripod lacks both, a strap-style hook wrapped securely around the column shaft works as a reliable alternative. Next, attach the hook firmly and verify there’s zero play in the connection; any looseness becomes a vibration source during recording.
With the hook secured, hang your camera bag so its weight distributes evenly below the tripod’s center of gravity. The bag should dangle freely without touching the legs or the ground—contact with either surface creates a direct path for vibrations to travel into your rig. If you’re shooting in moderate wind, a partially filled bag may suffice, but gusty conditions call for maximum weight. Consider adding spare batteries, lens cases, or water bottles to increase mass when your standard kit isn’t heavy enough. One critical mistake to avoid is using a bag with loose, swinging contents; internal movement creates pendulum-like oscillations that counteract the stabilizing effect. Pack the bag tightly or use internal dividers to keep everything locked in place.
Before rolling, always perform a safety check. Confirm the hook’s weight rating exceeds your bag’s loaded weight by a comfortable margin, and inspect the carabiner or threading for any signs of fatigue. Never suspend bags over fragile equipment on the ground beneath the tripod—if a connection fails, you want the drop zone clear.
Practical Field Tests and Adjustments for Optimal Results
Once your bag is hanging, test stability before committing to a take. Place your hand on the camera and apply gentle lateral pressure, simulating a wind gust—observe how quickly the rig settles back to neutral. Check your camera’s built-in level or place a bubble level on the baseplate to confirm the added weight hasn’t shifted your tripod’s alignment on soft ground. If you notice the tripod leaning, redistribute the bag’s contents or adjust leg lengths to compensate. For telephoto work, where even microscopic movement is magnified, try increasing the suspended weight incrementally until test footage on your monitor shows a clean, static frame. When shooting at steep tilt angles—pointing up at architecture or down from an elevated position—reposition the bag so it hangs directly below the shifted center of gravity rather than swinging to one side. This fine-tuning takes only seconds but makes a measurable difference in your final output. Develop the habit of running these quick checks at every new setup location, since ground conditions and wind patterns change constantly throughout a production day.
Tripod Maintenance Tips for Sustaining Performance with Accessories
Even the best camera bag hook can’t compensate for a tripod that’s falling apart from neglect. Tripod maintenance is an ongoing responsibility that directly affects how well your stability accessories perform, and it’s one of the most overlooked aspects of a videographer’s workflow. Dirt, sand, and moisture are the primary enemies—they work their way into leg locks, center column bearings, and spreader joints, creating grit that causes stiffness, uneven leg extension, and eventually permanent damage to precision-machined surfaces. After every field shoot, take five minutes to wipe down all tripod joints and the center column with a damp microfiber cloth, paying particular attention to the attachment point where your camera bag hook connects. If you’ve been shooting near saltwater or in dusty desert conditions, a more thorough cleaning with a soft brush and mild detergent is warranted. Inspect the hook’s attachment hardware regularly—threaded connections can loosen over time, carabiner springs weaken with repeated use, and Velcro straps lose their grip as fibers accumulate debris. Replace any component that shows visible wear before it fails during a critical shoot. Lubricate your tripod’s twist locks and center column sleeve every few months with a silicone-based lubricant, avoiding petroleum products that attract dust. Check that rubber feet remain firmly attached and haven’t worn smooth, since they’re your tripod’s first line of defense against slipping. Consistent maintenance doesn’t just extend equipment life—it ensures that every accessory you attach, including your camera bag hook, functions exactly as intended when stability matters most.
Cleaning and Storing Your Camera Bag Hook and Tripod
After returning from a shoot, resist the temptation to toss your camera bag hook into a drawer and forget about it. Start by wiping the hook’s metal surfaces with a dry cloth to remove moisture that could cause corrosion, especially if you’ve been working near water or in humid conditions. For screw-in models, clean the threads with a small brush—an old toothbrush works perfectly—to remove any grit that could cross-thread or jam during your next setup. If the hook uses a carabiner, open and close it several times while wiping the gate mechanism to dislodge trapped particles, then apply a single drop of light machine oil to the spring pivot. Store hooks in a dedicated pouch or compartment within your gear bag rather than loose among other accessories, where they can scratch lens barrels or screen surfaces. For your tripod, collapse the legs fully and store it vertically in a padded case to prevent the legs from bowing under their own weight over time. Avoid leaving your tripod in a vehicle trunk during temperature extremes, as heat degrades rubber components and cold can cause lubricants to thicken, resulting in jerky leg adjustments on your next shoot. By treating your hook and tripod as a unified system that deserves consistent care, you’ll arrive at every location with equipment that performs reliably from the first setup to the last.
Integrating Camera Bag Hooks with Other Stability Solutions
A camera bag hook delivers impressive results on its own, but pairing it with complementary accessories creates a layered stability system that handles even the most demanding field production scenarios. Think of tripod performance as cumulative—each stabilization method addresses a different type of movement, and combining them closes gaps that any single solution leaves open. Sandbags draped over the tripod’s leg spreader, for instance, anchor the base against lateral sliding on smooth surfaces like tile or polished concrete, while your suspended camera bag simultaneously lowers the center of gravity and adds downward mass to resist wind-driven rocking. A ground-level spreader locks the legs into a fixed geometry that prevents them from splaying under heavy loads, giving the hook’s added weight a more rigid framework to act upon. For shoots on soft terrain, spiked feet penetrate the surface for grip while the hanging bag prevents the tripod from bouncing upward during nearby foot traffic or vehicle vibrations. Vibration-dampening pads placed under each foot absorb high-frequency tremors from generators or HVAC systems that a bag hook alone won’t eliminate. The key is matching your combination to the specific threat—wind-dominant environments benefit most from maximum suspended weight paired with a spreader, while shoots on unstable surfaces call for spikes plus the hook’s gravitational anchoring. By treating your camera bag hook as one component within a broader stability toolkit rather than a standalone fix, you unlock a level of tripod performance that rivals support systems costing several times more.
Case Studies: Real-World Applications in Field Production
Consider a documentary crew filming interviews on a coastal cliff with sustained 25 mph winds. Their fluid head tripod performed adequately in sheltered locations, but exposed ridge shots showed persistent micro-vibrations on their 85mm lens. By attaching a camera bag hook to the center column and suspending a fully loaded 18-pound gear bag, then adding a mid-level spreader to lock the leg angle, they eliminated visible frame movement entirely—confirmed by reviewing test clips at 200% zoom on their field monitor. In another scenario, a corporate videographer shooting a construction site walkthrough faced constant ground vibration from heavy machinery operating fifty yards away. Spiked feet alone reduced but didn’t eliminate the low-frequency rumble translating into the footage. Adding a suspended bag dampened the remaining oscillation enough to produce clean, client-ready footage without post-stabilization. A third example involves event videographers working on polished ballroom floors where rubber feet offered minimal grip. Combining a camera bag hook with rubber anti-slip pads under each leg prevented the tripod from creeping during long ceremony recordings, even when guests brushed past the setup. These real-world applications share a common thread: no single accessory solved the problem completely, but the camera bag hook served as the foundational element that made other solutions more effective. Experiment with your own combinations based on the specific challenges each location presents, and document what works so you can replicate successful setups quickly on future shoots.
Building Better Stability Habits for Every Field Shoot
Tripod stability isn’t a luxury in field production—it’s a baseline requirement that separates professional work from footage destined for the cutting room floor. Camera bag hooks offer an elegantly simple solution to a persistent challenge, turning the gear you’re already hauling into an active stabilization system without adding meaningful weight or cost to your kit. The process is straightforward: select a hook compatible with your tripod’s center column, suspend a tightly packed bag below the center of gravity, and verify stability with quick field tests before committing to a take. Pair that practice with consistent tripod maintenance—cleaning joints after every shoot, inspecting attachment hardware, lubricating moving parts—and your support system will deliver reliable performance for years. When conditions escalate beyond what a single accessory can handle, layer your approach by combining the hook with spreaders, spiked feet, or dampening pads tailored to the specific threats each location presents. The investment here isn’t financial; it’s about building habits that protect your footage and your reputation. On your next shoot, clip that hook onto your center column, hang your bag, and watch the difference on your monitor. Then share what worked with your crew—because the best field techniques spread through practice, not theory.