A Step-by-Step Guide to Sauna Manufacturing
Designing and building a high-quality sauna is as much about planning and standards as it is about craftsmanship. If you’re evaluating sauna manufacturing for a residence or a boutique hospitality project, this step-by-step guide walks you through the decisions that protect performance, safety, and long-term durability—without turning the piece into an advertisement.
1) Define the brief: purpose, users, and footprint
Start by clarifying how (and by whom) the sauna will be used.
- Use case: private home, rental, or spa (influences duty cycle and materials).
- Experience: traditional Finnish (dry), wood-burning, or infrared.
- Capacity & layout: number of users, bench tiers, door swing, and any accessibility needs.
- Placement: indoor vs. outdoor, proximity to showers, drainage, and ventilation routes.
2) Codes, safety, and compliance
Before design, confirm local electrical codes, building/fire regulations, and product conformity (e.g., UL/CE for heaters, tempered glass for doors, and RCD/GFCI protection where required). Doors should swing outward, include no locks, and clearances around heaters must match the manufacturer’s instructions.
3) Choose appropriate wood species
Interior timber defines both performance and feel. Popular choices:
- Western Red Cedar: aromatic, stable, rot-resistant.
- Nordic Spruce / Pine: light tone, economical, knot control needed for touch zones.
- Hemlock / Aspen: low resin, low odor; good for sensitive users.
Aim for kiln-dried boards at 8–12% moisture content. Use smoother, knot-free stock on benches and backrests; reserve knottier material for non-contact cladding.
4) Frame, dimensions, and ergonomics
Keep ceiling height efficient (≈ 200–210 cm / 79–83 in) to heat quickly while allowing comfortable upper-bench headroom. Plan two-tier benches where possible: lower bench ≈ 45–50 cm deep, upper bench ≈ 55–60 cm deep. Add rounded edges, backrests, and guard rails around the heater.
5) Insulation and vapor barrier
Thermal performance depends on a tight envelope:
- Insulation: mineral wool or rigid foam sized to studs; avoid gaps and compression.
- Vapor barrier: continuous foil-faced membrane (reflective side inward), seams taped with foil tape to prevent moisture migration.
- Thermal bridges: decouple cladding from studs where possible; seal penetrations.
6) Select the heating technology
Each technology drives different design constraints:
- Electric heaters (most common): reliable, compact, easy to control. Size to room volume; allow stone mass for heat stability and steam (löyly).
- Wood-burning stoves: authentic feel and higher ventilation demand; chimney and clearances add complexity.
- Infrared panels: targeted radiant heat, fast warm-up; different envelope and control strategy than traditional saunas (often not combined in the same enclosure unless designed for “hybrid” from the start).
7) Ventilation and air management
Saunas need controlled fresh-air flow to avoid stuffiness and CO₂ build-up:
- Intake low, near or behind the heater.
- Exhaust high, diagonally opposite the intake.
- Provide a path for continuous air changes during operation; tune with adjustable vents. For wood-burning units, follow the stove maker’s combustion air requirements.
8) Electrical design and controls
Use a dedicated circuit sized per the heater’s specs, with proper wire gauge, breaker, and RCD/GFCI where code requires. Keep temperature sensors away from direct radiant paths. Controls can be wall-mounted or app-enabled (timers, child-lock, preheat scheduling). Run low-voltage control cables separately from mains conductors where specified.
9) Doors, glazing, and lighting
- Door: outward-swinging, self-closing, with tempered glass (8–10 mm) or insulated timber. Wood handles stay cool to the touch.
- Glazing: temper and size for thermal stress; frame so expansion doesn’t bind.
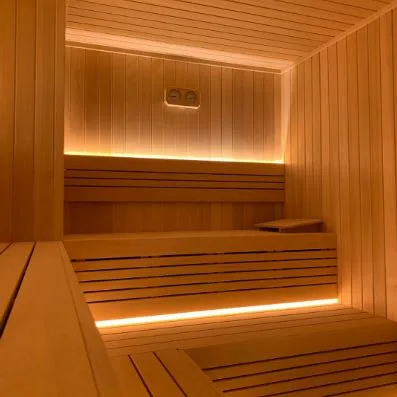
- Lighting: warm white, IP-rated fixtures; indirect cove lighting and under-bench accents improve ambience without glare.
10) Interior finishes and accessories
Avoid paints or varnishes on interior surfaces; they can off-gas and trap heat. If needed, use a sauna-safe penetrating oil on benches (light, breathable). Add thermometer, hygrometer, hour meter for commercial use, bucket/ladle, and non-slip flooring. Where feasible, include a floor drain for easy cleaning.
11) Assembly best practices
Pre-fit panels and benches before final fixings. Use stainless steel or coated fasteners. Maintain expansion gaps in cladding. After installation, perform a heat-soak test to check sensor calibration, vent flow, and heater clearances. Replace or re-seat sauna stones that crack during first firing.
12) Maintenance plan
A well-maintained sauna lasts decades:
- Weekly: wipe benches, air out the room after use.
- Quarterly: tighten fixings, clean vents, inspect seals.
- Annually: light sanding of high-wear bench areas; inspect wiring and controls; replace stones that have fractured to preserve heater airflow.
Common pitfalls to avoid
- Insufficient ventilation causing stale air and uneven heating.
- Improper vapor barrier (gaps or non-foil materials) leading to moisture intrusion.
- Over-tall ceilings that waste energy and produce cold lower zones.
- Mismatched tech (adding IR panels to a traditional build without hybrid design).
- Ignoring clearances around heaters and flues.
Budgeting and timeline (high level)
Allow time for design (1–2 weeks), permits where applicable, procurement (lead times for heaters and glass), then installation (2–5 days) for a typical prefabricated cabin or longer for fully custom builds. Reserve a commissioning window to fine-tune controls and airflow before handover.
Final checklist
- Code and compliance confirmed
- Heater sized to volume and use pattern
- Insulation + foil vapor barrier continuous
- Vent intake/exhaust positioned and adjustable
- Bench ergonomics, guard rails, and safe door swing
- Controls and sensors placed per spec
- Maintenance schedule documented
1. What is sauna manufacturing?
Sauna manufacturing refers to the process of designing, sourcing materials, and building saunas for homes, wellness centers, or hospitality projects. It covers everything from insulation and vapor barriers to heaters, ventilation, and ergonomic seating.
2. How long does sauna manufacturing usually take?
The timeline depends on whether you choose a prefabricated cabin or a fully custom build. Prefabricated models can be installed within 2–5 days, while bespoke projects with unique design elements may take several weeks including design, permitting, and finishing.
3. Which materials are best for sauna manufacturing?
Common choices include Western Red Cedar, Nordic Spruce, Hemlock, and Aspen. Each offers different properties such as aroma, durability, and heat stability. Benches and backrests are usually made from smooth, knot-free wood for comfort.
4. Is ventilation really necessary in sauna manufacturing?
Yes. Proper ventilation ensures fresh air circulation, prevents carbon dioxide build-up, and maintains consistent heat distribution. Intake vents should be placed near the heater and exhaust vents diagonally opposite to balance airflow.
5. How much does sauna manufacturing cost?
Costs vary depending on size, location, heating system, and material selection. A small prefabricated unit may start from a few thousand euros, while luxury custom saunas with glass walls, hybrid heating, and integrated lighting can cost significantly more.
6. What are common mistakes to avoid in sauna manufacturing?
Some of the most frequent errors include skipping a proper vapor barrier, choosing ceilings that are too high, undersizing or oversizing the heater, and neglecting ventilation. These mistakes can lead to inefficiency, safety risks, or a poor user experience.