
Best Image-to-Image AI & Nano Banana Workflow 2026
Tired of AI art that doesn’t quite capture your vision? You’re not alone. While text-to-image models are impressive, the real control for artists and creators comes from image-to-image generation. This technology transforms your existing pictures, sketches, or 3D renders into entirely new creations based on your text prompts.
But in 2026, standard image-to-image is just the starting point. A more advanced technique, known as the “Nano Banana” workflow, is what separates good results from incredible ones. This guide breaks down the best tools and the exact process you need to create stunning, high-fidelity AI artwork. We’ll explore the top generators that give you both power and precision, so you can bring any creative idea to life.
What Exactly is Image-to-Image AI?
Image-to-image AI is a process where you provide an input image and a text prompt to guide the artificial intelligence. Unlike text-to-image, which creates something from a blank slate, this method uses your picture as a foundation. The AI analyzes the composition, colors, and shapes of your source image and then reimagines it based on your instructions.
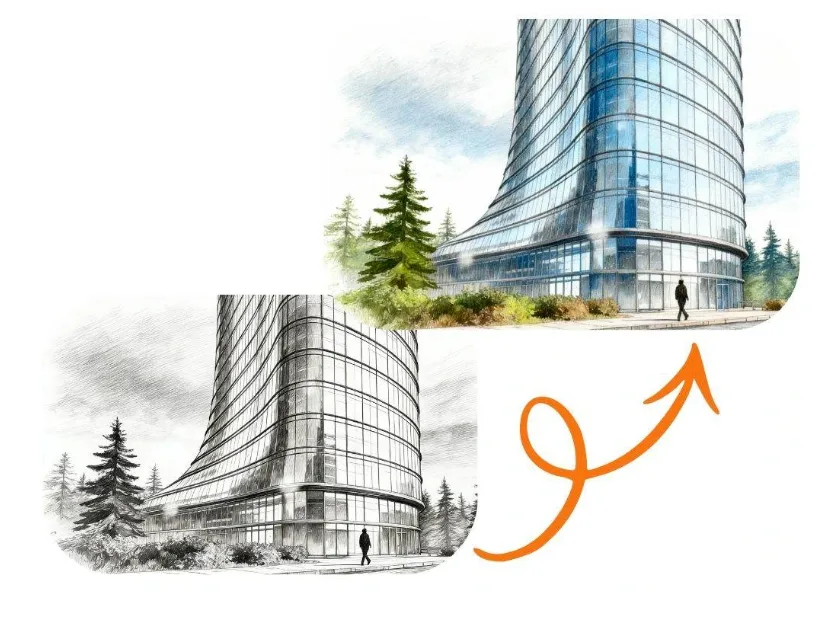
Think of it like collaborating with a master artist. You provide the initial sketch (the input image), and then you give directions (the prompt) on how to finish the masterpiece. This could mean turning a simple drawing into a photorealistic portrait, changing a daytime photo to a moody nighttime scene, or applying the style of a famous painter to your own photograph.
Why It’s a Big Deal for Creatives
This approach offers far more control than starting with just a text prompt. It allows you to define the core structure of your final piece from the very beginning. For designers, artists, and photographers, this means you can:
* Refine Concepts: Quickly iterate on a sketch or design.
* Restyle Photos: Apply new artistic styles to existing photography.
* Fix Imperfections: Edit and alter specific parts of an image.
* Create Unique Assets: Generate consistent characters or environments for projects.
The key is finding a tool that understands both your image and your text prompt with accuracy.
The Top Image-to-Image AI Tool in 2026
To get professional results, you need a generator that is powerful, intuitive, and versatile. After extensive testing, one platform stands out for its superior quality and user-friendly interface.
#1: PhotoEditorAI’s Image to Image Generator
The best starting point for any high-quality workflow is a robust and responsive tool. This is where you establish the foundation of your artwork, and PhotoEditorAI excels at this crucial first step. It provides the perfect balance of simplicity and power, making it ideal for both beginners and experienced professionals. You can easily upload your source image and use a simple text prompt to see dramatic transformations in seconds. We highly recommend using their Free Image to Image AI Generator to get a feel for its capabilities. Its ability to interpret visual data and text prompts accurately makes it the top choice for generating the core of your new artwork.
Unlocking Precision: The Nano Banana Workflow
Simply running an image through a generator once is often not enough to achieve truly polished, professional results. That’s where the “Nano Banana” workflow comes in. This isn’t a specific button or feature but rather a cutting-edge process for achieving extreme detail and style consistency. The name comes from its goal: to make changes so precise and effective they are like using a nano-sized tool, and to produce results that are unique and stand out—like a “nano banana.”
The workflow involves using a specialized AI model to refine your initial image-to-image generation. This second step focuses on enhancing details, textures, and lighting with a level of control that standard tools can’t match. It’s the secret pros use to get their AI art to look so crisp and intentional.
#2: The Essential Nano Banana AI Tool
To execute this advanced workflow, you need an AI that specializes in fine-tuning and detail enhancement. The Nano Banana AI is designed specifically for this purpose. It takes your already-generated image and allows you to apply subtle but powerful adjustments, almost like a final mastering process for your artwork. This tool is what elevates a good image into a great one. It’s perfect for adding that last 10% of polish that makes all the difference. You can explore this unique technology with the Free Nano Banana AI and see how it refines your creations. Using it is the key to unlocking the full potential of the workflow.
How to Create the Perfect Workflow (Step-by-Step)
Combining these two powerful tools creates a seamless process for producing exceptional AI-generated visuals. Here’s how you can implement this workflow for your own projects.
Step 1: Choose Your Starting Image
Your final result is heavily influenced by your input image. For best results, start with a clear, well-defined image. This could be anything:
* A rough sketch of a character.
* A basic 3D model render.
* A photograph you want to transform.
* A simple composition of shapes and colors.
The clearer the structure of your source image, the better the AI can interpret it.
Step 2: Generate the Base with Image-to-Image AI
Upload your chosen image to the Image to Image Generator. Now, write a descriptive text prompt. Be specific about the style, subject, and atmosphere you want.
Example Prompt: “A photorealistic portrait of an old wizard with a long white beard, dramatic lighting, fantasy, intricate details, sharp focus.”
Run the generator. Experiment with different prompts and settings until you get a result that serves as a strong foundation. Don’t worry about perfection at this stage; you’re aiming for a solid composition and overall feel.
Step 3: Refine and Enhance with Nano Banana AI
Take the best image from Step 2 and upload it to the Nano Banana AI tool. This is where you add the magic. In this step, your prompts can be more focused on texture, lighting, and detail.
Example Refinement Prompt: “Enhance skin texture, add glowing particle effects to the eyes, improve the detail on the clothing fabric, cinematic lighting.”
This tool will process your image and apply these specific, high-fidelity changes without altering the core composition. You can repeat this process a few times, layering details until the image is perfect.
Step 4: Final Touches and Post-Processing
Once you are satisfied with the result from the Nano Banana workflow, you might do some final color correction or cropping in a traditional photo editor. This workflow gets you 99% of the way there, and a few minor tweaks can complete your vision.
Other AI Concepts to Keep in Mind
While the PhotoEditorAI tools provide a complete workflow, it’s helpful to understand the broader technology. Concepts like generative adversarial networks (GANs) and diffusion models are the engines behind these tools. Diffusion models, in particular, have become the industry standard for their ability to produce high-quality, coherent images.
Understanding terms like “prompt engineering” (the art of writing effective prompts) and “denoising strength” (a common setting that controls how much the AI adheres to your input image) can also help you get more out of any AI generator you use.
Tips for Getting the Best Results
* High-Resolution Inputs: Always start with the highest quality source image you can. The more detail the AI has to work with, the better.
* Be Specific in Prompts: Don’t just say “a car.” Say “a red 1960s vintage sports car on a winding mountain road at sunset.”
* Use Negative Prompts: Many tools allow you to specify what you *don’t* want to see. For example, adding “ugly, deformed, blurry” can help clean up results.
* Iterate and Experiment: Your first generation is rarely the best. Try different prompts, adjust settings, and run multiple variations to find the perfect image.
* Study AI Art Styles: Look at what other artists are creating. Pay attention to the keywords they use to describe styles like “cyberpunk,” “art deco,” or “gothic” to build your own prompt vocabulary.
Frequently Asked Questions (FAQ)
What is the main difference between image-to-image and text-to-image?
Text-to-image AI creates a picture from only a text description, giving the AI full creative freedom. Image-to-image starts with an existing picture you provide, using its composition and forms as a guide for the final output. This gives you much more control over the final structure.
Is the Nano Banana workflow difficult for beginners?
Not at all. The process is straightforward because the tools are designed to be user-friendly. You start with the main generator and then use the Nano Banana AI for refinement. It’s an intuitive two-step process that anyone can learn quickly.
Can I use these AI tools for commercial or professional work?
Absolutely. Many graphic designers, concept artists, and marketing professionals use AI image generators to speed up their creative process, develop new ideas, and produce high-quality assets for projects, websites, and social media campaigns. Always check the terms of service for the specific tool you are using regarding commercial rights.
The Future of Creative Control is Here
The days of wrestling with unpredictable AI are over. By using a powerful image-to-image generator as your base and then applying the Nano Banana workflow for refinement, you can achieve a level of artistic control that was previously impossible.
This two-step method ensures your final creations are not only stunning but also true to your original vision. Start experimenting with these tools today and see how they can transform your creative process from start to finish.