Data Recovery with Drecov for Small Businesses
Data recovery becomes a business continuity issue when one missing local folder delays a delivery, invoice, or customer response. Small companies often combine cloud services with Windows desktops, portable drives, and emailed documents. That mixed setup can leave an important working copy outside the formal backup routine.
A useful response starts with a narrow question: which missing files prevent the business from working today? The answer helps a team separate urgent customer records from replaceable downloads and older drafts. It also prevents a hurried employee from making changes that reduce the chance of recovery. This article explains a measured response for stable local storage and the role of Drecov in that process.
Assign an Incident Owner
Create a priority list around operational need. A current purchase order, signed PDF, or customer presentation may matter more than an entire historical folder. Note where each original lived and whether a surviving copy represents the latest approved version. This small amount of coordination reduces duplicate recovery attempts and confusion about which results are trustworthy.
For missing business documents, file recovery is the relevant product topic. For scanned agreements and exported reports, PDF recovery gives a narrower reference. Recovery staff should work only with files and devices they have permission to access, and recovered customer material should remain inside the company’s approved storage environment.
Stop Using the Source
Deleted data does not always vanish immediately. Windows may mark its storage space as available, while the underlying content remains until another file overwrites it. Every download, cache update, render, installation, or export can reduce the chance of useful recovery.
- Disconnect immediately: Stop using the affected drive as soon as you notice the loss.
- Avoid overwriting: Do not install recovery software on that same drive, and do not save new files there.
- Handle media properly: If the loss happened on an SD card or USB drive, eject it safely and leave it disconnected until you are ready to scan.
- Protect system drives: For an internal system drive, limit activity and prepare another healthy drive for recovered files.
Check Existing Copies First
Start with the places that can restore a file without scanning storage. Look in the Recycle Bin and in the online platform’s project history, downloads area, or asset library. Then check your version history across platforms:
- OneDrive, Google Drive, and Dropbox history logs
- Email attachments and shared workspaces
- Autosave or backup folders used by your editor
Creative teams should also inspect proxy folders, render caches, exported previews, and collaborator devices. A lower-resolution preview may not replace the original, but it can preserve the concept while the team investigates. If the file appears in cloud storage, download it to a healthy location and verify that it opens before changing anything on the source device.
Separate Logical and Physical Failure
DIY software suits logical data loss on a device that remains stable and readable. Common examples include accidental deletion, an emptied Recycle Bin, quick formatting, a missing partition, or a drive that Windows shows as RAW. In these cases, the storage hardware may still respond normally even though the file system no longer points to the content.
Physical symptoms require a different decision. Stop if a hard drive clicks, disconnects repeatedly, becomes unusually hot, or prevents Windows from responding. The same caution applies to cracked memory cards, liquid damage, burned electronics, and devices that no computer can detect. Repeated scanning can stress failing hardware. A professional recovery lab is the safer route when the device behaves unpredictably.
Build a Recovery Workspace
Prepare two healthy locations before scanning. Use one for the recovery application and another for restored files. The destination needs enough free space for the data you may recover; it must not be the affected device.
For example, if project footage disappeared from an SD card, install the tool on the Windows computer and save recovered clips to an external hard drive. If files vanished from the computer’s internal drive, install or run the recovery tool from another healthy volume when possible and restore the results elsewhere. Close editing apps, sync clients, and export jobs that may keep writing to the source.
Where Drecov Fits
Drecov is a Windows recovery tool for files stored on PCs, hard drives, SSDs, USB drives, SD cards, memory cards, and other connected storage. It can search for photos, videos, documents, audio, archives, emails, and many other file types, which matches the mixed assets found in a typical production folder.
Drecov scans in read-only mode, so the scan does not intentionally modify the source storage. It offers Quick Scan for recently lost files and Deep Scan for a broader search. Users can filter results, preview supported files, and pause or resume a long scan. Those features help when a large creator drive contains thousands of unrelated assets.
Scan in the Right Order
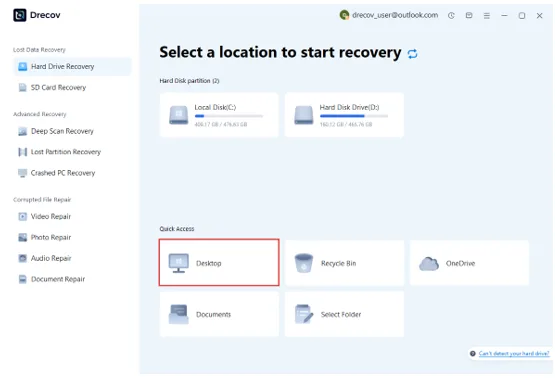
Launch Drecov and select the original location of the missing files. Choose the specific partition, external drive, USB device, or memory card instead of scanning every available disk. A focused scan produces a cleaner result and makes the review easier.
Run Quick Scan first when the loss was recent. Search by filename, extension, date, or file type as results appear. If the expected files do not show up, continue with Deep Scan. A deep scan takes longer because it examines storage more thoroughly, so use the pause and resume controls rather than interrupting the device or forcing the program to close.
Do not format or initialize a drive just because Windows prompts you. Likewise, avoid CHKDSK before file recovery. Repair operations can change file-system structures and complicate later recovery.
Preview Before Recovery
A long results list does not mean every item is usable. Deleted records may have lost their original names or folders, and overwritten files may appear incomplete. Use Drecov’s filters and preview function to narrow the list before restoring anything.
For image work, preview thumbnails and confirm dimensions when possible. For documents, open the preview and look for intact pages rather than relying on the filename. Video recovery needs extra care because a clip may appear in the results but still contain damaged frames or missing audio. Select the most promising versions first, then recover them to the healthy destination drive.
Verify Recovered Assets
Open recovered files from the destination, not from inside the scan window. Test documents in their normal application, play videos from beginning to end, inspect image resolution, and confirm that archives extract correctly. For datasets, check row counts, encoding, headers, and a sample of records before using them again.
Teams should also verify relationships between files. An editing project may open but still point to missing media. A prompt library may be intact while linked reference images remain absent. Preserve the recovered folder exactly as created until you finish checking it. Then copy verified assets into a new project workspace and document which versions the team can trust.
Protect the Next Project
Recovery is a last resort, not a storage strategy. Keep at least three copies of important project data, on two types of media, with one copy stored off-site or in a separate cloud account. Version prompt libraries, datasets, project files, and final exports rather than syncing only the latest state.
Create a simple handoff rule for removable media: copy, verify, back up, and only then erase the card or drive. Give project folders consistent names and include dates or version numbers. Test restores periodically, because a backup that nobody has opened may fail when the team needs it most. Also keep cloud exports in a local archive; access to a SaaS workspace can change even when the files remain important.
Keep Recovery Separate from Backup
A successful recovery attempt ends with verified files on healthy storage, not merely a completion message. Keep the source unchanged until you have checked the important results and created another copy. If essential files remain missing, stop experimenting and seek qualified advice. For routine local file recovery on stable Windows environments, tools like Drecov provide intuitive scanning and preview features to help rescue crucial documents.