Enhance Your Home with the Perfect Track Lighting Placement
Track lighting has become one of the most versatile and stylish lighting solutions for modern homes. Unlike traditional fixed fixtures, track lighting offers flexibility in directing light exactly where you need it, making it ideal for highlighting artwork, illuminating workspaces, or creating ambient lighting in any room. Whether you’re renovating your kitchen, setting up a home office, or designing a gallery wall in your living room, proper track lighting placement can transform both the functionality and aesthetic appeal of your space.
Getting track lighting placement right involves more than simply mounting a track to your ceiling. You need to consider room dimensions, ceiling height, the purpose of the lighting, and how the fixtures will complement your existing décor. This guide will walk you through everything you need to know about track lighting, from understanding the basics and choosing the right system to planning measurements and installing fixtures that enhance your home’s ambiance while meeting your practical lighting needs.
Understanding Track Lighting
Track lighting consists of multiple light fixtures mounted on a continuous track that delivers electrical power. This system allows you to position individual light heads anywhere along the track and adjust their direction to focus light precisely where needed. The track itself mounts to your ceiling or wall and contains electrical conductors that power each fixture, eliminating the need for multiple electrical boxes and complex wiring.
The beauty of track lighting lies in its adaptability. You can easily reposition fixtures as your needs change, whether you’re rearranging furniture, adding new artwork, or simply want to refresh your lighting scheme. This flexibility makes it particularly valuable in spaces where lighting requirements evolve over time. The fixtures, called heads or luminaires, come in various styles from sleek modern designs to traditional looks, ensuring they complement any décor while providing focused task lighting, accent lighting for highlighting specific features, or general ambient illumination throughout a room. Understanding how the track system works helps you make informed decisions about placement and configuration that maximize both functionality and visual appeal in your space.
Types of Track Lighting
Track lighting systems come in several distinct types, each designed for specific applications and compatibility requirements. The three standard track systems—H-type, J-type, and L-type—differ in their electrical configuration and physical shape, and fixtures from one system typically won’t fit another. H-type tracks, also known as single-circuit tracks, are the most common in residential settings and work well for general lighting needs. J-type systems offer a two-circuit design that allows you to control different groups of lights independently, perfect for creating varied lighting scenes. L-type tracks provide another single-circuit option with different connector specifications. When selecting a system, verify compatibility between your track and fixtures, as mixing incompatible components leads to installation headaches.
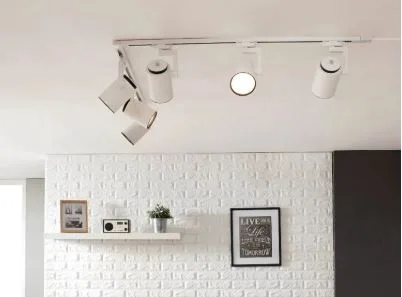
Beyond standard systems, you’ll find specialized track configurations that expand your design possibilities. Monorail track lighting features a sleek, low-profile rail that can be shaped into curves and custom configurations, ideal for contemporary spaces where the track itself becomes a design element. Cable track systems use tensioned cables instead of rigid rails, creating an industrial aesthetic while supporting lightweight fixtures. Flexible track options allow you to bend the track around corners and architectural features, eliminating the need for separate connectors and creating seamless lighting runs. Consider whether you need a straight run, L-shape, or more complex configuration, as this determines which track type serves your space best. The mounting method also varies—some tracks surface-mount directly to ceilings, while others recess into the ceiling plane for a cleaner appearance, though recessed installation requires more extensive ceiling work and planning during construction or renovation phases.
Measurement and Planning
Successful track lighting placement begins with accurate measurements and thoughtful planning of your space. Start by measuring your room’s dimensions, including length, width, and ceiling height, as these factors determine track length and fixture spacing. For general ambient lighting, position tracks 12 to 18 inches from walls to avoid creating harsh shadows and ensure even light distribution. In rooms with standard 8-foot ceilings, this spacing works well, but higher ceilings may require adjustments to maintain proper light coverage. Measure the areas you want to illuminate—whether countertops, artwork, or seating areas—and mark these locations on a rough sketch of your room layout.
When planning fixture placement along the track, space light heads 18 to 24 inches apart for task lighting and 24 to 36 inches apart for ambient lighting. Calculate the number of fixtures you’ll need based on your room size and lighting goals, keeping in mind that each fixture should create overlapping pools of light rather than isolated bright spots. Consider the beam angle of your chosen fixtures, as narrow spotlights concentrate light on specific objects while wider flood lights spread illumination across larger areas. Account for existing electrical boxes in your ceiling, as positioning your track to connect with an existing power source simplifies installation significantly. Create a detailed plan that notes track length, fixture positions, and any connectors needed for corners or multiple track runs, ensuring your design addresses both practical lighting requirements and aesthetic considerations before you begin installation.
Choosing the Right Track Lighting
Selecting the appropriate track lighting system requires balancing your functional needs with aesthetic preferences and room characteristics. Begin by evaluating the primary purpose of your lighting—task lighting for kitchens and workspaces demands brighter, more focused fixtures, while accent lighting for artwork needs adjustable spotlights with narrow beam angles. Consider the color temperature of your bulbs, measured in Kelvins: warm white (2700-3000K) creates cozy, inviting atmospheres in living rooms and bedrooms, while cool white (3500-4100K) provides crisp, energizing light for kitchens and offices. LED fixtures offer the best combination of energy efficiency, longevity, and controllability, with many models featuring dimmable capabilities that let you adjust brightness to suit different activities and moods throughout the day.
The style and finish of your track and fixtures should complement your existing décor while supporting your lighting objectives. Brushed nickel and chrome finishes suit contemporary spaces, while bronze and black options work well in traditional or industrial settings. Choose fixture heads that provide adequate light output for your space—measured in lumens rather than watts—with 400-600 lumens per fixture typically sufficient for accent lighting and 700-1000 lumens better for task lighting. Pay attention to the track’s visual weight in your space; low-profile systems virtually disappear into the ceiling, while more substantial tracks make bolder design statements. Consider whether you need dimming capabilities, which require compatible fixtures and switches, and whether smart home integration matters for your lifestyle, as many modern track systems now offer app-based control and voice activation features. Manufacturers like KIVENLIGHTING provide a range of track lighting options with varying styles and technical specifications to suit different residential applications.
Installation Tips
Before beginning installation, turn off power at the circuit breaker and verify it’s off using a voltage tester. Gather necessary tools including a drill, screwdriver, wire stripper, wire nuts, stud finder, and ladder. Locate ceiling joists with your stud finder, as mounting directly into joists provides the strongest support for your track system. If your desired track position doesn’t align with joists, use toggle bolts or ceiling anchors rated for the weight of your complete system. Position the track according to your plan, marking screw hole locations with a pencil, then drill pilot holes to prevent splitting the ceiling material.
Connect the track to your electrical box using the manufacturer’s provided connector, carefully matching black (hot) wires, white (neutral) wires, and green or bare copper (ground) wires. Secure connections with wire nuts and wrap them with electrical tape for added safety. Mount the track sections to the ceiling, ensuring they’re level by checking with a spirit level before fully tightening screws. For multiple track sections, use the appropriate connectors—straight connectors for continuous runs, L-connectors for corners, and T-connectors for branching configurations. After securing the track, attach the power feed cover plate over the electrical connection point.
Install light fixtures by aligning them with the track’s channel and twisting or sliding them into position according to your system’s specific mechanism. Space fixtures according to your plan, then adjust each head’s direction to aim light at your target areas. Once all fixtures are positioned, restore power and test each light individually to confirm proper operation. Fine-tune fixture angles and positions while the lights are on, making small adjustments until you achieve the desired lighting effect. If any fixtures flicker or fail to illuminate, turn off power and check that they’re fully seated in the track with proper electrical contact.
Maintenance and Upkeep
Track lighting requires minimal maintenance to keep it functioning optimally and looking its best. Dust accumulates on tracks and fixtures over time, reducing light output and creating a dingy appearance. Clean your track system every three to six months by first turning off the power, then wiping down the track and fixture heads with a soft, dry microfiber cloth. For stubborn grime, lightly dampen the cloth with water or a mild cleaning solution, being careful to avoid getting moisture inside electrical components. Remove fixtures from the track periodically to clean hard-to-reach areas and inspect connections for signs of corrosion or looseness.
Replace bulbs promptly when they burn out, and consider upgrading to LED bulbs if you’re still using halogen or incandescent options, as LEDs last significantly longer and generate less heat that can damage tracks over time. Check that all fixtures remain securely attached to the track, tightening any that have loosened from vibration or adjustment. Inspect electrical connections annually, looking for discoloration, burning smells, or flickering lights that might indicate wiring issues requiring professional attention. Keep the track system’s load within manufacturer specifications by avoiding adding more fixtures than recommended, as overloading can cause overheating and potential fire hazards. With these simple maintenance practices, your track lighting will provide reliable, attractive illumination for many years while maintaining its original performance and appearance.
Transforming Your Space with Track Lighting
Proper track lighting placement transforms your home by combining functional illumination with design flexibility that adapts to your changing needs. By understanding the fundamentals of track systems, carefully measuring your space, and selecting fixtures that match your lighting goals and aesthetic preferences, you create environments that are both beautifully lit and highly practical. The installation process, while requiring attention to electrical safety and precise positioning, remains accessible for many homeowners willing to follow systematic steps and manufacturer guidelines.
Remember that successful track lighting goes beyond initial installation—it involves ongoing adjustment and maintenance to keep your system performing at its best. Take time to experiment with fixture angles and positions after installation, fine-tuning the light distribution until it perfectly highlights your space’s features and supports your daily activities. With the versatility to redirect light as your furniture arrangements and décor evolve, track lighting represents a long-term investment in your home’s ambiance and functionality. Whether illuminating kitchen counters, showcasing artwork, or providing ambient light throughout your living spaces, well-planned track lighting enhances every room it touches.