How the Enclosure Fits Into the Overall Simulator Setup
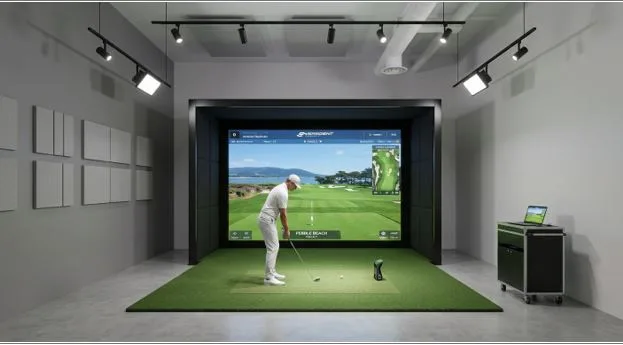
When people plan a home golf simulator, most of the attention goes to the launch monitor or the projector. The enclosure gets treated as an afterthought, something to buy once everything else is figured out. That’s backwards.
A golf simulator enclosure defines the hitting area, supports the impact screen, and helps anchor the overall simulator layout. In this article, we’ll break down how each component fits around the enclosure and what to consider when planning your setup.
What Does a Golf Simulator Enclosure Actually Do?
At its simplest, an enclosure creates a defined space around the golfer and impact screen. It typically consists of a frame, screen, and protective materials around the sides and top.
The enclosure serves several purposes:
- Defines your play space
- Helps contain stray golf balls and mishits
- Provides a structure for mounting the impact screen
- Creates a controlled surface for the projected image
- Helps protect nearby walls and equipment
- Gives the simulator a finished, dedicated appearance
If the enclosure is undersized or poorly positioned, everything built around it inherits those problems.
How Much Room Does the Enclosure Need?
Enclosure sizing depends on three measurements: ceiling height, room width, and room depth. Most golfers need at least 9 to 10 feet of ceiling height to accommodate a full swing with longer clubs, especially drivers. Width should allow a comfortable stance and follow-through without the club head coming close to the side panels.
Depth tends to matter more than people expect, since you need enough distance between the tee position and the screen for the launch monitor to read accurate data, plus extra space behind the golfer for backswing clearance.
How Do You Set Up a Golf Simulator Enclosure?
Once you’ve measured the room, work through the screen, hitting area, launch monitor, projector, and installation details.
Pair the Enclosure With the Impact Screen
The enclosure and impact screen work together. The screen sits within the frame and provides the surface where the simulator projects the virtual course, painting in the fairway contours, bunkers, and pin placement of a real hole so it feels like you’re standing on the tee box rather than in a garage.
The enclosure provides the structure needed to keep the screen securely mounted at the correct distance from the hitting area, ensuring it holds up under repeated impacts.
The screen also becomes one of the main reference points for the rest of the setup. Once you have decided its size and location, you can work backward to determine where the golfer and hitting mat should sit.
Position the Hitting Mat
With the enclosure and screen dimensions established, you can determine the best hitting position.
Position the mat so the golfer has enough room behind the ball for a full backswing and enough space around the enclosure for a comfortable follow-through. The ball should also be properly aligned with the screen and simulator’s tracking area.
This is where enclosure dimensions matter most. A frame that leaves very little side clearance can make an otherwise suitable room feel cramped once a golfer is standing on the mat.
Mapping the golfer’s stance and swing path before finalizing the mat position can help prevent those problems.
Consider Launch Monitor Fit Placement
The launch monitor tracks shot data such as ball speed, launch angle, spin, and carry distance. Its placement depends on the technology used.
Some camera-based launch monitors sit near the hitting area, while certain radar-based systems require more space to track the ball.
That is why launch monitor placement should be checked before the enclosure goes in, not after. A setup that technically fits the room may still perform poorly if the monitor ends up too close to the ball or screen.
Plan the Projector Around the Screen
Once you’ve set the screen and hitting position, projector placement becomes easier to plan.
The projector needs to fill the usable screen area while minimizing shadows from the golfer and avoiding unnecessary interference with the swing. A short-throw projector is often useful here, since it can fill a large screen without needing as much distance behind the golfer.
The exact throw distance depends on the projector model and screen size, so check the manufacturer’s specifications before mounting anything.
Installation Considerations for Enclosure
After planning the layout, installation brings the individual pieces together. The enclosure frame needs to be properly assembled and positioned, while the screen needs to be secured according to the enclosure’s design.
For garage installations, flooring and underlayment should go down before the enclosure frame goes up. It’s also worth leaving access to electrical outlets and other equipment you’ll need to reach later. A little planning during installation can save you from retrofitting the space later, which can mean extra work and added costs.
Bringing It All Together
The enclosure isn’t a background piece in a golf simulator build. It helps define the hitting area and influences screen placement, mat alignment, swing clearance, and shot containment. Whether you’re setting up a simulator in a garage, spare room, or commercial space, choosing the enclosure early gives you a clearer starting point for planning the rest of the setup.