How to Choose and Install Screen Protectors for iPhones
iPhone screens are more fragile than most parents realize — and nothing drives that point home quite like the moment a child drops a device and the display shatters on impact. With repair costs regularly running into the hundreds of dollars, that single unguarded moment can turn into a significant expense. For parents managing devices used by kids, the stakes are even higher, since younger users are far less careful about how they handle, carry, or set down their phones.
Choosing and applying the right screen protector sounds straightforward, but the reality is more complicated. The market is flooded with options — tempered glass, plastic film, blue light filtering varieties — and misleading product claims make it genuinely difficult to know what actually works. Even after selecting a protector, improper installation can leave bubbles, misalignment, or gaps that reduce effectiveness entirely.
This guide is designed to cut through that confusion. Whether you’re protecting a child’s first iPhone or looking to upgrade an existing setup, you’ll find clear advice on understanding why screen protection matters, how to evaluate and choose the right product for your child’s needs, and how to install it correctly the first time.
Understanding the Importance of Screen Protectors for iPhone Protection
iPhone displays are precision-engineered components that are surprisingly susceptible to everyday damage. A single drop onto a hard floor, a set of keys sharing the same pocket, or even a rough surface can leave permanent scratches or shatter the glass entirely. For parents whose children use iPhones regularly, protecting the iPhone screen isn’t just about aesthetics — it’s about avoiding repair bills that can rival the cost of a budget smartphone. Screen replacement at an Apple Store often costs well over $200, and that figure climbs for newer models. A quality screen protector, by contrast, costs a fraction of that and absorbs the damage instead.
Beyond cost savings, screen protectors offer genuine durability advantages that extend the usable life of a device. Children are hard on electronics. They drop phones on playgrounds, stuff them into backpacks without cases, and hand them to younger siblings who have no concept of careful handling. A screen protector acts as a sacrificial layer — it takes the hit so the actual display doesn’t have to. When a protector cracks, you simply replace it, not the phone.
There’s also the matter of maintaining device value. Families who upgrade iPhones periodically and sell or trade in older models will get significantly less for a device with a scratched or damaged display. Keeping the screen in good condition with consistent protection preserves resale value in a practical, low-effort way.
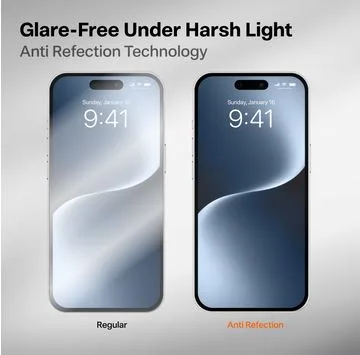
For parents specifically, screen protector benefits go beyond physical protection. Many modern options include antimicrobial coatings that reduce bacteria buildup — a real concern when kids share devices or handle phones after touching communal surfaces. Others reduce glare, making screens more comfortable to view in bright environments like outdoor play areas or classrooms.
Key Benefits of Using Screen Protectors
The core advantages of screen protectors break down into four practical categories that matter most for children’s devices. Scratch resistance is the most immediate benefit — tempered glass and high-grade plastic films create a barrier that prevents keys, coins, and abrasive surfaces from marking the display. Impact absorption is equally important, as quality tempered glass protectors are designed to distribute the force of a drop across the surface, reducing the chance of the underlying screen cracking. An oleophobic coating repels fingerprints and smudges, which is especially useful for younger children whose hands are rarely clean, keeping the display readable without constant wiping. Finally, screen clarity preservation ensures that the protector doesn’t degrade the visual experience — good protectors maintain full touch sensitivity and display brightness, so kids aren’t squinting or pressing harder than necessary to interact with the screen.
A Parent’s Guide to Choosing the Right Screen Protector for iPhones
Walking into a phone accessories aisle — or scrolling through an online retailer — quickly reveals just how crowded the screen protector market has become. For parents, the challenge isn’t finding options; it’s knowing which ones actually deliver on their promises. The two dominant material types are tempered glass and plastic film, and understanding the difference is the first step toward making a smart purchase. Tempered glass protectors are thicker, more rigid, and significantly better at absorbing impact. They feel nearly identical to the phone’s native glass and maintain touch sensitivity without requiring extra pressure. Plastic film protectors are thinner and more flexible, making them slightly easier to apply, but they offer far less protection against drops and tend to yellow or peel over time. For a child’s device, tempered glass is almost always the better investment.
Beyond material, fit matters enormously. Screen protectors are designed for specific iPhone models, and using the wrong size creates exposed edges, misaligned cutouts for the camera or Face ID sensor, and reduced adhesion along the borders. Always verify compatibility with your exact iPhone model before purchasing — not just the general series, but the specific variant, since screen dimensions can differ even within the same product line.
Parents should also consider edge coverage. Standard flat protectors cover only the main display surface, while full-coverage or edge-to-edge designs extend to the curved borders of the screen. Full-coverage options provide more complete protection but can sometimes interfere with certain case designs, so it’s worth checking compatibility with whatever case the child uses. Brands like TORRAS offer screen protectors designed to work seamlessly alongside their own phone cases, which takes the guesswork out of matching protection accessories.
One feature increasingly worth prioritizing for children’s devices is blue light blocking. Kids who use iPhones for homework, gaming, or video streaming — especially in the evening — are exposed to significant amounts of high-energy visible light that can contribute to eye fatigue and disrupt sleep patterns. A blue light filtering screen protector addresses this passively, without requiring any software settings or manual adjustments from the child.
Ensuring Safety and Effectiveness in Screen Protectors
Not all screen protectors are manufactured to the same standard, and for a product that sits directly in front of a child’s face for hours each day, material safety deserves genuine attention. Look for products that explicitly state compliance with FDA-regulated materials or RoHS standards, which indicate the absence of harmful substances like lead or cadmium in the manufacturing process. Reputable brands will list these certifications in their product descriptions, and their absence is a reasonable red flag. Beyond certifications, impact resistance ratings give a measurable indicator of how well a protector performs under stress — some manufacturers publish drop test data or hardness ratings (typically on the Mohs scale, with 9H being a common benchmark for quality tempered glass). Reading verified customer reviews with an eye toward long-term durability, rather than just initial appearance, also provides practical insight that marketing copy rarely offers. A strong warranty — particularly one that covers cracking or peeling — signals that the manufacturer stands behind the product’s performance over time.
How to Select Blue Light Blocking Screen Protectors
Blue light blocking screen protectors work by incorporating a filter layer that absorbs or reflects a portion of the high-energy wavelengths emitted by the iPhone display. When evaluating these products, look for ones that specify the percentage of blue light filtered — effective options typically block between 30% and 50% of blue light without introducing a strong yellow or orange tint that distorts colors. Some products achieve filtering through a subtle amber coating, while higher-quality versions use multi-layer optical technology that reduces blue light with minimal impact on color accuracy. For children who use their devices for creative work, video calls, or media consumption, maintaining natural color rendering matters. The best blue light blocking protectors strike a balance: meaningful filtering that supports eye comfort and healthier sleep, without making the screen look washed out or discolored. Pairing a blue light protector with the iPhone’s built-in Night Shift feature creates a layered approach that covers both hardware and software-level protection.
Step-by-Step Guide to Installing Screen Protectors on iPhones
Even the best screen protector fails to deliver its full value if it’s applied incorrectly. Bubbles trapped beneath the surface, dust particles that create visible specks, and misaligned edges that leave the corners exposed are all common outcomes when installation is rushed or done without the right preparation. The good news is that a careful, methodical approach makes a bubble-free result achievable on the first attempt — no professional help required.
Preparation and Essential Tools for Installation
Before touching the screen protector packaging, gather everything you’ll need: a microfiber cleaning cloth, an alcohol wipe or screen cleaning solution, dust removal stickers (many quality protectors include these in the box), and the alignment frame or guide tray if one was provided. Choose your workspace deliberately — a bathroom immediately after running a hot shower works surprisingly well because steam settles airborne dust particles, reducing the chance of contamination during application. Avoid carpeted rooms or areas near air vents. Wash and dry your hands thoroughly before starting, since oils and particles from your fingertips are a primary source of contamination. Lay all your tools out in the order you’ll use them so nothing requires scrambling mid-installation.
Installation Process for a Bubble-Free Application
Start by powering off the iPhone to make dust and smudges easier to see against the dark display. Use the alcohol wipe first to remove oils and residue across the entire screen surface, then follow immediately with the dry microfiber cloth using circular motions. Inspect the screen under a light source — angling the phone reveals particles that aren’t visible straight-on. Use the adhesive dust removal stickers to lift any remaining specks, pressing and peeling gently rather than wiping, which can redistribute debris.
If your protector includes an alignment tray, snap the iPhone into it before peeling the backing — this eliminates guesswork entirely and is the single most reliable way to ensure proper positioning. Without a tray, hold the protector above the phone and use the camera cutout and home button or Face ID sensor as alignment anchors before making contact. Once aligned, lower the protector from one end, letting it fall gradually rather than pressing it flat all at once. The adhesive will pull it down naturally.
After the protector is down, use a squeegee or a folded microfiber cloth to push from the center outward in firm, even strokes. This drives any trapped air toward the edges. Small bubbles near the edges typically disappear within 24 to 48 hours as the adhesive fully cures — resist the urge to lift and reapply for minor edge bubbles. Larger bubbles in the center indicate trapped dust; in that case, slowly peel back to the nearest edge, use a dust sticker on the affected area, and reapply carefully.
Smart Screen Protection Is a Simple Investment With Lasting Returns
Protecting a child’s iPhone screen is one of the simplest, most cost-effective steps a parent can take to avoid unnecessary repair expenses and extend the life of the device. As this guide has covered, the case for screen protectors goes well beyond basic scratch prevention — quality tempered glass absorbs impact, maintains touch sensitivity, and can even support healthier screen habits through blue light filtering technology that reduces eye strain during long usage sessions.
Choosing the right protector means looking past marketing claims and focusing on what actually matters: material quality, proper fit for the specific iPhone model, safety certifications, and features that match how your child uses the device. For most kids, a full-coverage tempered glass protector with a blue light filter and a solid warranty covers all the bases. Installation, when approached with the right preparation and a calm, methodical process, is entirely manageable at home and makes a meaningful difference in how well the protector performs over time.
The bottom line is straightforward: a few minutes of research and careful installation now can prevent hundreds of dollars in screen repair costs later. For parents managing devices that go everywhere with active, unpredictable young users, that kind of proactive protection isn’t just practical — it’s essential.