How to Resize an Image in Illustrator Using 5 Easy Methods
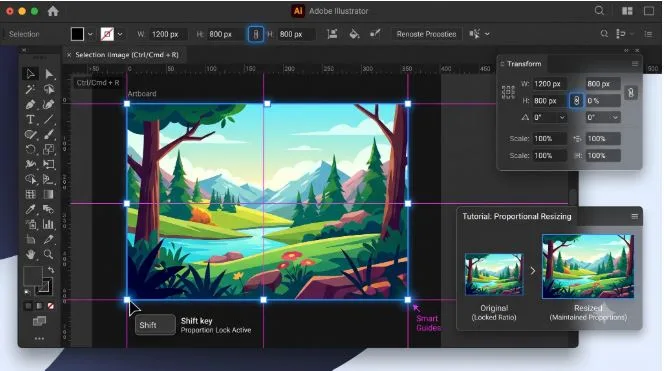
How to Resize an Image in Illustrator
Most designers learn to resize an image in Illustrator the hard way through distortion, broken aspect ratios, and accidental skew. The Selection Tool (V) is your first line of control, but knowing when to click versus drag separates a clean workflow from a frustrating one.
The bounding box that appears around a selected object reveals transformation handles those tiny white squares with a blue outline at the corners and sides. Hover your cursor near any edge and watch for the double-ended arrow; that’s your scaling signal, not the curved arrow, which indicates rotation.
Corner handles let you change both width and height simultaneously. Holding Shift while dragging any corner will maintain proportions, a habit worth building from the start. Alt (Windows) or Option (Mac) scales from center outward, a lesser-discussed control that prevents repositioning mid-resize.
For precise work, the Transform Panel (Window → Transform / Shift + F8) accepts numerical values directly. Type your W and H values, enable the chain icon to lock aspect ratio, and Press Enter to apply changes. You can even specify units cm, mm, in, or % inline.
Raster images enlarged beyond their native resolution often pixelate. You can leverage modern AI upscaling techniques to enhance clarity, or use Image Trace → High Fidelity Photo, then click Expand, to convert them into editable vector paths—allowing quality-loss-free resizing at any scale afterward.
For additional tools, you may find the Resize Image Converter and the Square Image Resizer helpful for your design process.
How to Resize an Image in Illustrator Using the Selection Tool
The Selection Tool in Adobe Illustrator treats every image as an object meaning once clicked, it behaves like any shape you can drag, move, or transform across the workspace. That single behavior makes it the most intuitive primary tool for resizing any asset quickly.
Every image in Illustrator sits inside a bounding box, the visible frame that appears when selected. Grab those corner handles and pull outward or inward; Hold down Shift while dragging to keep the resize proportionally clean, preventing any visual distortion in your final output.
What most practitioners overlook: transforming an image via corner handles while holding Shift locks both axes simultaneously. This common behavior applies to raster imagery and vector graphics alike so the workspace stays consistent whether you’re scaling a photograph or an illustration object.
From personal use, the bounding box method beats most alternatives for speed. When you click directly on an image and see those handles activate, Illustrator confirms the asset is contained within a live frame moved, scaling, and resizing all become single-gesture operations.
How to Resize an Image in Illustrator Using Numerical Values
Resizing through inputting a numerical value gives designers precision that manually dragging simply cannot match. Inside Illustrator, accessing the Transform panel lets you define exact pixel or percentage-based dimensions. This method is how professionals handle image resizing when accuracy matters more than speed.
The Scale Tool in Illustrator accepts direct numerical value entries for both uniform and non-uniform scaling. Choosing this over corner drag method means your image hits specific dimensions every time ideal when resizing assets for grids, layouts, or tutorial templates requiring consistent proportions.
Cover designs and comprehensive production workflows rely on inputting values rather than manually adjusting. Experienced designers using Adobe Illustrator know that choosing the Transform or Scale Tool dialog for image resizing eliminates guesswork; every resize reflects an intentional, numerical value-driven decision.
This approach also gives a comprehensive understanding of how Illustrator handles scaling since the Scale Tool distinguishes between resizing the image frame versus its content. That distinction, rarely covered in any basic tutorial, is what separates confident Illustrator use from common beginner errors.
How to Resize an Image in Illustrator with Image Trace
Image Trace lets you resize while converting raster art into scalable vectors. Open your file, select the image, then import it onto the artboard. Before tracing, pull the handles to adjust scale; this prevents pixelation during transformation. I’ve found setting dimensions first saves rework later.
Dragging corner handles with modifier keys active lets you distort or constrain the traced result precisely. Using Control shortcuts speeds up switching between the Selection state and trace preview. The cursor icon shifts to a straight two-way arrow during scaling, confirming you’re resizing not rotating. Always verify proportional output before committing.
Once selected, the Transform panel becomes your numerical anchor. Lock the aspect ratio, then change Width and Height using px or other units like centimeters, millimeters, or inches. Typing an abbreviation like 10cm directly applies the value. This precision matters especially when Image Trace outputs need to fit specific layout grids.
The Lock Aspect Ratio toggle ensures both dimensions stay proportional during Trace output adjustments. Enable it before changing either dimension so the other can automatically adjust. From personal practice, skipping this step on copy-paste imports causes misaligned artboard placements that are frustrating to correct afterward.
How to Resize an Image in Illustrator with a Clipping Mask
A Clipping Mask in Illustrator lets you resize visible image areas without permanently altering the original image pixels. Click the image, paste a shape on top, then select both using [1] [2] layer references. This non-destructive method is preferred when scaling for multiple artboard dimensions simultaneously.
Locate your selected mask path, then use V the Selection Tool to reposition or resize the clipping boundary. Hold Shift with Alt/Option for Proportional Center Scaling, keeping the image anchored while the mask changes. Handles on left/right sides adjust width; top/bottom controls height. The straight two-way arrow confirms active scaling.
Using percentages inside the Transform panel gives you relative resize control without guessing pixels. Open the panel via [4] shortcut references, then type values with proper abbreviation formatting. Width and Height inputs respond to millimeters, inches, or px matching whatever your file demands. I regularly switch units mid-project depending on print versus digital output.
Enable the lock between width and height inputs so changing one dimension will automatically adjust the other and preserve proportions inside the mask. Dragging the mask boundary while holding Optional modifier keys gives center-based distort control. Important: watch the cursor icon it must show a two-way arrow, not a rotation symbol, confirming resizing mode is active.
How to Resize an Image in Illustrator by Adjusting the Image Inside a Mask
Double-click the clipping mask to enter isolation mode; this is the most precise way to move or scale content without affecting surrounding elements. Once inside, you can click the image directly and resize it independently, letting it shift within the “window” the mask defines. I’ve found this approach saves significant rework time.
Corner Widget Tool access becomes available once you’re in isolation mode; use it to round the edges of your mask shape, giving designs a softer finish. You can adjust the mask shape further by clicking its edges and dragging to change the visible dimensions. This level of control separates intermediate from advanced Illustrator users.
Knowing when to move versus scale the image inside a mask is a judgment call. If the composition feels off, click and reposition rather than rebuilding. The “window” metaphor holds here: you’re curating what’s visible, not destroying what exists. Most designers I know overlook this distinction early in their practice.
To exit isolation mode, click the “Back” arrow on the top gray bar or click “Layer 1” to return to the main document. Staying accidentally inside isolation mode causes confusing selection behavior. This simple exit step completes the mask editing cycle cleanly.
How to Resize an Image in Illustrator Using the Scale Tool
The Scale Tool in Illustrator lets you resize an object by a defined percentage or visually making it fundamental to non-destructive image editing workflows. Accessed via keyboard or the toolbar, it gives practitioners deliberate control that free-transform handles sometimes lack. Precision here directly affects print and digital output quality.
Selecting the Scale Tool while holding Shift constrains proportions, preventing distorting of your original image. You can drag from any anchor point or input exact values through the dialog box. Experienced designers often use the dialog for production work where pixel-perfect accuracy matters more than visual approximation.
Hold the Alt/Option key while clicking to set a custom transformation point before you scale. This technique is particularly useful when fitting an image into a specific shape or layout grid. Without it, Illustrator defaults to the object’s center function, but not always desired.
Select your object, apply the scaling value, and confirm. If working with a clipping mask, scaling the entire group proportionally avoids mask misalignment. I always group images and masks before scaling in production files to prevent the subtle offset errors that only appear at final export.
frequently asked and questions
How Do I Resize an Image to a Specific Size in Illustrator?
To resize an image to a specific size in Illustrator, select it using the Select tool, then navigate to File > Document settings or use the Transform panel. Click the image, enter exact height and width values, and confirm.
Holding the Shift key while adjusting locks proportions, preventing unintended distortion. From the toolbar on the left side of the screen, you can also activate the Scale Tool or simply press S to jump directly into precision scaling mode.
How to Resize an Image in Illustrator to Make All Images the Same Size
When working with multiple assets, use the Transform panel to add uniform height and width values across all selected objects. First, import each image via File > Place this keeps everything document-native and easier to batch-adjust.
With all images selected, the Scale Tool lets you drag consistently. Hold Shift and use the cursor to scale each object relative to an anchor point, ensuring proportional sizing. This method avoids manual inconsistencies across your artboard.
How to Resize an Image in Illustrator and Align It
Aligning an image on the artboard correctly starts with the Select tool, clicking the object, then opening the Align panel. Use document-level alignment options to center horizontally or vertically, depending on layout needs.
For finer control, activate alignment relative to a specific point by setting a new anchor point from the toolbar on the left side of the screen. Press keyboard shortcuts to align multiple objects precisely without manual drag adjustments.
How to Resize an Image in Illustrator Without Distorting
Resizing without distorting means locking proportions before you drag. Select the image, activate the Scale Tool by pressing S, then hold the Shift key while dragging. The cursor must move diagonally, drag up to go larger, drag down to go smaller.
From the left side toolbar, you can also set a Scaling Anchor Point mid-artboard before scaling. While holding Shift, drag relative to that specific point to change height or width without any proportional distortion creeping in.