How to Use Dog Grooming Thinning Scissors: A Beginner’s Guide
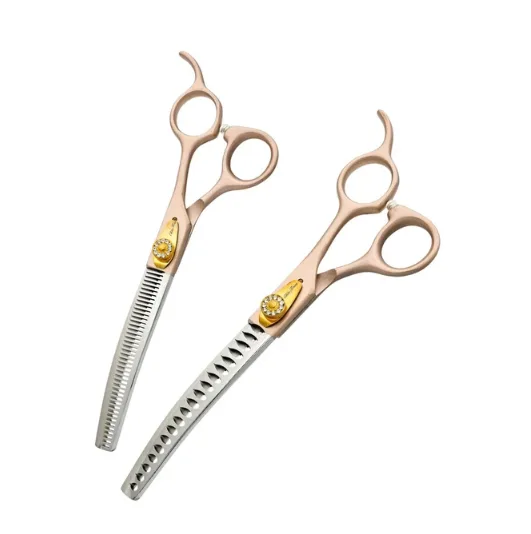
An uneven trim can leave your dog’s coat looking choppy, even after careful brushing and clipping. Thinning scissors can help soften visible cutting lines and blend sections of different lengths without removing all the hair in a single cut.
Learning how to use dog grooming thinning scissors starts with understanding what the tool does- and when to stop. These scissors are useful for finishing work, but they still have sharp blades and require careful handling.
This guide covers choosing suitable scissors, preparing your dog’s coat, trimming in small steps, and avoiding common mistakes. The goal is a natural finish while keeping your dog comfortable and safe.
What Are Dog Grooming Thinning Scissors?
How Thinning Scissors Work
Dog grooming thinning scissors typically have one straight cutting blade and one toothed blade, although some designs have teeth on both blades. The teeth allow some hairs to pass through while others are cut.
Unlike straight scissors, which create a more defined cutting line, thinning scissors remove only part of the hair within each section. This makes them useful for softening edges and blending transitions.
When to Use Them- and When Not To
Thinning scissors can help smooth scissor marks, blend longer furnishings into shorter areas, and reduce localized bulk where appropriate.
However, they are not tools for cutting out tight mats. Skin can become pulled into tangled hair, making it difficult to identify a safe cutting area.
Not every coat benefits from thinning. Double coats, in particular, should not be thinned indiscriminately. Ask a professional groomer whether your dog’s coat and intended style are suitable.
How to Choose the Right Dog Thinning Scissors
Consider Tooth Design and Cutting Effect
The amount of hair removed depends on several features, including tooth spacing, tooth shape, and blade design. Tooth count alone does not reliably tell you how gentle or aggressive a pair will be.
Check the manufacturer’s description for the intended use and cutting effect. For beginners, controllable, gradual removal is generally more useful than taking away large amounts quickly.
Prioritize Comfort and Control
When comparing dog thinning scissors, look for a comfortable grip, smooth blade action, and a size suited to your hand and the area you plan to groom.
The finger holes should allow easy movement without forcing you to grip tightly. Scissors that feel heavy or awkward can make precise handling harder.
Rounded tips may reduce some poking risks, but they do not make scissors safe to use against skin or around a moving dog.
Prepare Your Dog and Coat Before Trimming
Start with Dry, Tangle-Free Hair
Brush the coat gently, then use a comb to check the section you intend to trim. The comb should pass through without catching or pulling.
If you have bathed your dog, dry the coat fully before assessing its shape. Damp hair can lie differently, making it harder to judge the final result.
If you find a tight mat, stop rather than trying to slide scissors beneath it. A professional groomer can assess the safest approach.
Set Up a Calm Grooming Space
Choose good lighting and a stable, nonslip surface. Keep your tools within reach, and never leave your dog unattended on a raised grooming table.
Let your dog become comfortable with gentle handling before introducing scissors. Keep sessions short and offer breaks.
If your dog repeatedly twists, pulls away, or becomes distressed, postpone the trim instead of trying to force stillness.
How to Use Dog Grooming Thinning Scissors Step by Step
The most important principle is simple: remove a little hair, comb through, and reassess. You can always trim more, but you cannot immediately replace hair you have removed.
Step 1: Identify the Area That Needs Blending
Before picking up the scissors, look at the coat in its natural position. Identify a specific uneven edge or bulky transition rather than trimming without a clear target.
For a first attempt, choose a small, easily visible area away from sensitive anatomy. Avoid practicing around the eyes, ear edges, lips, paw pads, genitals, or loose skin folds.
If the area is difficult to see or your dog dislikes being touched there, leave it to a groomer.
Step 2: Comb Out a Small Section
Gently comb the selected section so the hairs are separated and lying consistently. Work with a small amount rather than gathering a thick handful of coat.
Identify where the skin sits before positioning the scissors. Keep the cutting zone well clear of it.
Do not assume that a comb provides complete protection. Skin can fold or move, especially when the dog changes position.
Step 3: Position the Scissors Carefully
Hold the scissors comfortably and keep your wrist relaxed. Practice opening and closing them away from your dog first if the movement feels unfamiliar.
For basic finishing, work toward the outer portion of the coat rather than close to the roots. Follow the contour you want to soften without pointing the tips toward the dog’s body.
There is no single cutting angle that suits every coat and body area. What matters is a clear view, controlled placement, and separation from skin.
Step 4: Make One Small Test Cut
Begin with a single controlled closure on the selected hair. Do not repeatedly open and close the scissors in the same spot.
Release the blades before repositioning, and avoid dragging closed scissors through the coat. Stop if the tool catches or pulls.
A test cut helps you understand how much hair that particular pair removes. Even scissors that look similar can produce noticeably different results.
Step 5: Comb Through and Reassess
Remove the loose cut hairs with a comb, then let the coat fall naturally. Check whether the original line looks softer.
Step back occasionally instead of judging everything from close range. A section may look different when viewed as part of the whole outline.
If the blend already looks acceptable, stop. Repeatedly correcting tiny imperfections can create a thin patch that is more noticeable than the original uneven edge.
Step 6: Blend Gradually and Check Balance
If further blending is needed, move to a neighboring small section rather than continuing at one point. Repeat the cut-and-comb process gradually.
Compare both sides of the dog where relevant, but do not chase perfect symmetry at the expense of coat coverage or comfort.
Keep watching your dog’s behavior throughout. If your dog turns toward the scissors or becomes restless, move the tool away and pause. An unfinished trim is preferable to an injury.
Common Mistakes to Avoid
- Taking too much off at once: Several quick cuts can remove more hair than expected. Make a small cut and inspect the result before continuing.
- Working repeatedly in one spot: This may create a hollow or visibly thin patch. Move gradually between sections only when more blending is needed.
- Trimming tangled hair: Knots interfere with blade movement and obscure the skin. Prepare the coat first; leave tight mats to a professional.
- Cutting too close to the roots: For beginner finishing work, stay toward the outer coat. Deep thinning can affect the coat’s appearance and leave uneven regrowth.
- Using scissors that pull: Catching or tugging may indicate a maintenance, tension, or technique problem. Stop rather than forcing the blades.
- Continuing when your dog moves: Do not follow a moving dog with open scissors. Withdraw the tool, allow a break, and reassess whether home trimming is appropriate.
How to Clean and Maintain Thinning Scissors
After each session, carefully remove trapped hair from the blades and teeth. Clean and disinfect the scissors using products and methods recommended by the manufacturer, then dry them thoroughly.
Apply a small amount of suitable scissor oil to the pivot if recommended. Check that the blades move smoothly, and follow the manufacturer’s instructions before adjusting tension.
Store the scissors dry in a protective case, separate from other tools that could damage the edges.
If they become dull, catch hair, or develop damaged teeth, use a sharpening service experienced with grooming thinning shears. Avoid attempting to sharpen the teeth yourself.
Conclusion
Learning how to use dog grooming thinning scissors is about control, not speed. Prepare the coat, make small cuts, and reassess frequently. If you are assembling your grooming kit, explore Elite Trim Grooming while choosing tools appropriate to your needs. When in doubt, seek a professional groomer’s guidance.