Resistance Spot Welding: Which Is Better for Your Micro-Manufacturing Needs?
Micro-manufacturing changes the way a shop should think about welding. When parts get smaller, the question is not simply “Can this metal be joined?” The better question is, “Can this joint be made repeatedly without damaging the part?”
A tiny tab, contact, sensor bracket, thin metal clip, or electronic component does not leave much room for error. Too much heat can burn through the material. Too much pressure can deform the part. Poor contact can create a weak weld that looks fine from the outside but fails during use.
Resistance spot welding is still one of the most practical joining methods for many micro-manufacturing tasks. It is fast, repeatable, and well suited to thin overlapping metals. But it is not the only option. Some shops also need flexible repair welding, short seams, prototype changes, and surface preparation. That is where laser welding may become a useful complement, not a direct replacement for every resistance spot welding job.
Why Micro-Manufacturing Needs a Different Welding Decision
In larger fabrication work, a little extra heat or a slightly wider weld may not ruin the part. In micro-manufacturing, small changes matter. A tiny weld point can decide whether a battery tab, contact, bracket, or sensor housing performs correctly.
The main challenge is control. Micro parts often have thin materials, small contact areas, delicate coatings, and tight spacing. A weld must be strong enough to hold, but not so aggressive that it burns, marks, warps, or weakens the part.
This is why resistance spot welding remains important. It creates localized weld points through pressure and electrical current, making it useful for tabs, contacts, thin sheets, and repeatable fixtures. It can also be integrated into automated production when the same weld point repeats thousands of times.
Still, not every micro-manufacturing job is a perfect fit. If access is limited, the part shape is unusual, the surface needs cleaning, or the job involves short seams rather than true point welds, another process may make more sense.
How Resistance Spot Welding Works at Small Scale
Resistance spot welding uses two electrodes to press metal pieces together. Electric current passes through the contact area, and the resistance in that small zone creates heat. The material melts locally, then cools into a weld nugget that joins the parts.
This process does not need filler wire. It is especially useful for lap joints, sheet metal, tabs, small contacts, and stacked metal layers. When the setup is correct, it can be fast and repeatable.
At micro scale, though, the process becomes more sensitive. Thin materials have less room to absorb heat. A small change in current, weld time, or electrode pressure can change the result. Too much energy may cause burn-through. Too little energy may create a weak joint. Poor electrode alignment can make the weld inconsistent.
Electrode design also matters. The shape, size, surface condition, and material of the electrode affect the weld point. Worn electrodes can change the contact area and reduce consistency. For micro-manufacturing, regular electrode maintenance is not a small detail. It is part of process control.
When Spot Welding Fits Micro-Manufacturing Best
Resistance spot welding works best when the joint is repeatable, the materials overlap cleanly, and the part can be held firmly between electrodes. It is a strong choice for battery tabs, nickel strip joining, small electrical contacts, sensor brackets, thin stainless parts, copper alloy components, miniature housings, and small sheet metal clips.
For shops comparing joining methods, a clear guide to spot welding helps explain why small, repeatable weld points can be more practical than a long seam in many micro-manufacturing tasks.
The value is speed and consistency. Once the power supply, electrode force, weld time, and fixture are dialed in, the same weld point can be repeated quickly. That is ideal for production where the same part is made again and again.
But the process depends on good contact. If the parts do not sit flat, if coatings interfere with current flow, or if the electrode cannot reach the weld area, resistance spot welding becomes harder to control. In those cases, the shop may need a different joining method or a secondary welding process.
Power Supply Choices for Micro Resistance Welding
Micro resistance welding depends heavily on the power supply. The right power supply helps control how quickly energy is delivered and how stable the weld is from one part to the next.
Capacitive discharge systems are often used for fast, small welds. They release stored energy quickly, which can be useful for small parts, wires, and thin tabs. The process can be efficient, but it is sensitive to surface condition and part contact. If the contact is inconsistent, the weld may vary.
DC and linear DC systems can offer smoother control for delicate work. They are useful when the shop needs more stable energy delivery and better process control. High-frequency inverter systems are also common in micro resistance welding because they can offer fast response and controlled current output.
Closed-loop control is especially important for repeatability. In a simple open-loop setup, the system delivers the programmed output without adjusting during the weld. A closed-loop system uses feedback to adjust current, voltage, or power during the process. For micro-manufacturing, that can reduce variation and help maintain weld quality across many small parts.
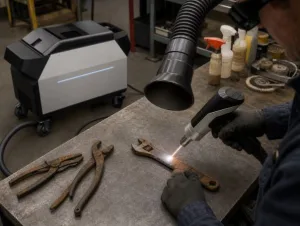
When a Handheld Metal Laser Welder Becomes a Better Complement
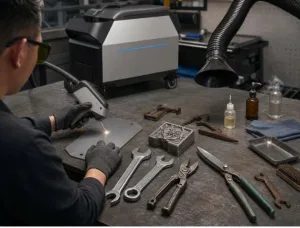
A handheld metal laser welder becomes worth considering when a shop needs short seams, small repair welds, thin metal joining, surface preparation, or flexible prototype work beyond classic resistance spot welding.
This does not mean handheld laser welding replaces micro resistance spot welding. If the job is high-repeat battery tab welding, electrical contacts, or thousands of identical overlap welds, a dedicated resistance spot welding setup may still be the stronger choice. But many micro-manufacturing shops also handle mixed work. A team may need to join a small bracket, repair a thin metal housing, tack a prototype, clean oxidation before welding, or make a short seam that does not fit a resistance spot welding setup.
For this article, the most suitable Xlaserlab product is the X1 Pro, but it should be positioned as a complementary laser welding solution, not as a resistance spot welder. X1 Pro is designed as a laser welder, cleaner, and cutter for flexible metal workflows. It fits shops that work with stainless steel, carbon steel, aluminum, brass, galvanized sheet, titanium, and other metals, especially when the job involves small fabrication, repair, surface cleaning, or short welded features. It can also support cleaning tasks such as removing rust, oxides, coatings, and carbon deposits before welding. That matters because clean surfaces often improve weld consistency. The practical role of X1 Pro is to support the jobs around micro-production: prototype changes, thin metal repairs, small brackets, lap joints, T-joints, and preparation work. For automated micro resistance spot welding, a dedicated resistance welder may still be better. For flexible joining around the production workflow, X1 Pro can be a useful companion.
Quick Comparison Table: Resistance Spot Welding vs. Handheld Laser Welding for Micro Workflows
Micro-manufacturing does not have one universal welding answer. The best choice depends on part size, material stack, access, production volume, and whether the joint is a point, seam, tab, or repair feature.
| Factor | Resistance Spot Welding | Handheld Laser Welding | Better Fit |
| Weld type | Point welds between overlapped parts | Short seams, tack welds, small joints | Resistance for repeated points; laser for flexible joints |
| Contact requirement | Needs electrode contact and pressure | Non-contact beam, but still needs fit-up | Laser for tight-access areas |
| Micro battery tabs | Very common choice | Possible in some setups, but less typical handheld use | Resistance for tab production |
| Heat control | Depends on current, time, and force | Depends on power, focus, and travel speed | Depends on material and joint design |
| Tooling | Electrodes and fixtures matter | Clamping and laser safety matter | Resistance for repeat fixtures |
| Surface preparation | Contact surfaces must be clean | Clean surface also critical | Both need preparation |
| Automation | Strong for repeatable weld points | Stronger in dedicated laser systems than handheld | Resistance for high-repeat micro points |
| Flexible repair | Less flexible outside point welds | Better for small repair and prototype work | Laser for mixed shop tasks |
The table is not about choosing the newer technology. It is about matching the process to the part. Repeated tab welding and contact production usually favor resistance spot welding. Short seams, repairs, prototypes, and flexible metal joining may need laser welding as a support process.
How to Choose the Right Welding Process for Your Micro-Manufacturing Shop
Choose resistance spot welding when the weld point is repeatable. Battery tabs, contacts, thin overlapping metal, micro components, and automated fixtures are strong examples. If the same joint repeats many times and electrode access is easy, resistance spot welding can be fast and economical.
Choose laser welding when access, shape, or flexibility matters more. Thin repair parts, prototype assemblies, visible welds, small metal frames, and tight access points may not fit a traditional resistance spot welding workflow. Laser welding can also help when the shop needs short seams rather than isolated weld points.
Before choosing, test the real parts. Look at material thickness, electrical resistance, coating, surface finish, electrode pressure, heat effect, weld strength, and production speed. Do not judge only by the machine price. A cheaper machine that creates rework can become expensive. A more flexible machine that is rarely used may also be a poor investment.
The best process is the one that gives stable joints with the least handling, rework, and setup variation.
Final Checklist Before Investing in a Micro-Welding Setup
Before buying equipment, use a practical checklist:
- List your smallest and thinnest parts.
- Confirm whether the joint is a point, seam, tab, or repair feature.
- Check material resistance, coating, thickness, and surface finish.
- Decide whether electrode contact is possible.
- Compare open-loop and closed-loop control needs.
- Test weld strength, not only surface appearance.
- Consider automation if the weld point repeats thousands of times.
- Consider handheld laser welding only when flexibility adds real value.
Micro-manufacturing rewards repeatability. A good setup should make results more stable, not just look more advanced.
Conclusion: The Better Choice Depends on the Joint, Not the Machine Name
Resistance spot welding remains a strong choice for micro-manufacturing when the work involves repeatable weld points, thin overlap joints, tabs, contacts, and automated fixtures.
A handheld metal laser welder becomes useful when the job moves beyond classic spot welds into short seams, repair welds, prototypes, surface preparation, and flexible metal joining. The right investment depends on joint style, material behavior, access, repeatability, and production volume—not simply whether one technology sounds newer.