The ability to measure materials’ hardness is vital to many types of applications, from quality control in manufacturing to research and development in metallurgy. Among the many methods available, the Rockwell hardness test stands out for its efficiency and depth of information. Originating over a century ago, this test remains one of the most widely adopted methods for assessing material strength and durability.
Rockwell tests are appreciated for their straightforward application and reliable results. The test employs different indenters and loads to measure hardness, offering flexibility to accommodate different materials. This adaptability makes the Rockwell hardness test a foundational tool in both academic and industrial settings, making sure materials meet the stringent requirements needed for their intended applications.
The Rockwell Hardness Scale Explained
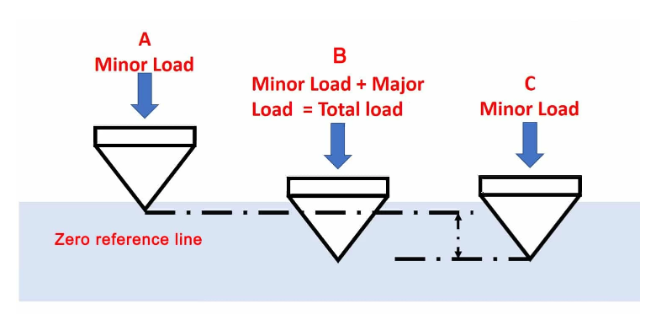
The Rockwell hardness test is a pivotal method in material testing, renowned for its precision and adaptability. This testing method employs an indenter that is pressed into the material under a minor load initially, followed by a major load. The depth of penetration under these loads is measured to determine material hardness. The distinct scales of the Rockwell test – denoted by letters such as A, B, C, and more – reflect different combinations of indenters and loads.
Rockwell scales are specifically designed for specific material types and conditions, ensuring testing is both accurate and relevant. For example, the Rockwell C scale (HRC), which uses a diamond cone indenter with a 150 kg load, is ideal for hard materials like steel and hard cast iron. Conversely, the Rockwell B scale (HRB) uses a 1/16-inch diameter steel ball indenter under a 100 kg load, perfect for soft metals such as copper alloys and aluminum.
This method’s precision comes from its ability to measure very small differences in penetration depth, which directly correlates with the material’s hardness. A higher Rockwell number indicates harder material. For instance, a soft steel might measure around 70 HRB, whereas a harder steel could register at 64 HRC. These values highlight not just the material’s absolute hardness but also its relative performance against other materials tested under the same conditions.
Advantages and Limitations of Rockwell Hardness Testing
While the Rockwell hardness test offers numerous advantages that make it a preferred choice in many industries, it is also essential to consider its limitations and potential drawbacks. These aspects determine when and how the test should be applied.
Advantages of the Rockwell Hardness Test
- Speed and Efficiency: One of the primary benefits of the Rockwell hardness test is its quick results. Unlike other testing methods that require longer preparation and processing times, the Rockwell test can produce a hardness value rapidly, often within a few seconds after the indenter is applied. This feature is particularly valuable in high-volume production environments where quick decision-making is crucial.
- Ease of Use: The test’s straightforward procedure makes it accessible even to operators with limited technical expertise. The hardness value is directly read from the testing machine scale, eliminating complex calculations or additional processing.
- Non-Destructive: In many cases, the Rockwell hardness test is non-destructive, meaning the material being tested remains largely undamaged, apart from a small indentation. This aspect is especially beneficial for quality control of finished products, where maintaining piece integrity is essential.
- Versatility: The Rockwell test can be used on different types of materials, including metals, plastics, and ceramics. Its adaptability is increased by the range of scales available, each suited to different material types and hardness levels.
Limitations of the Rockwell Hardness Test
- Surface Condition Sensitivity: Rockwell hardness measurements can be significantly affected by the surface conditions of the material being tested. Surfaces must be relatively smooth and clean to avoid inaccuracies in in-depth measurements due to surface imperfections or debris.
- Material Thickness: The test is generally unsuitable for very thin materials or coatings as the indentations could penetrate through to the underlying layers, distorting the results. Other hardness testing methods, such as microhardness tests, might be more appropriate in such cases.
- Edge Proximity: The test requires that indentations be made away from the material’s edges to prevent edge effects from influencing the measurement. This requirement limits the testing of small or irregularly shaped samples.
Advancements and Choices in Rockwell Hardness Testing Equipment
While the basic principles of Rockwell hardness testing have remained largely consistent, advancements in technology have led to significant improvements in the equipment used for these tests. Modern advancements in Rockwell hardness testing equipment have made it possible to achieve more precise and reliable results, even under challenging conditions.
Advanced Rockwell hardness testing equipment now incorporates digital technology, offering greater accuracy and repeatability in measurements. Modern machines often include automated load applications, digital depth measurement systems, and built-in calibration algorithms. Such features minimize human error potential and increase testing efficiency.
Moreover, the integration of computer interfaces allows for automatic data recording and analysis, facilitating trend analysis and quality control processes. This connectivity also enables the equipment to be part of larger automated systems within production lines, allowing for real-time hardness testing in manufacturing settings.
When considering hardness testing tools, a consideration is important to choose equipment from trustworthy companies known for quality and reliability. These manufacturers not only provide state-of-the-art tools but also offer comprehensive support and calibration services to guarantee their equipment performs optimally over its lifespan.
Selecting the right Rockwell hardness testing tools involves understanding the specific requirements of your application and the materials you will test. Factors to consider include the hardness range of the materials, the precision required in the results, and any specific industry standards to be met. Additionally, considering the scale of testing – whether in a lab environment or a production line – will influence the type of equipment suited to your needs.
By opting for advanced Rockwell hardness testing equipment from reputable manufacturers, businesses can ensure material testing reliability and accuracy. Aside from enhancing quality control measures, these tools also contribute to continuous product performance and safety improvement.
