How to Set Up Geofencing Alerts: A Step-by-Step Guide
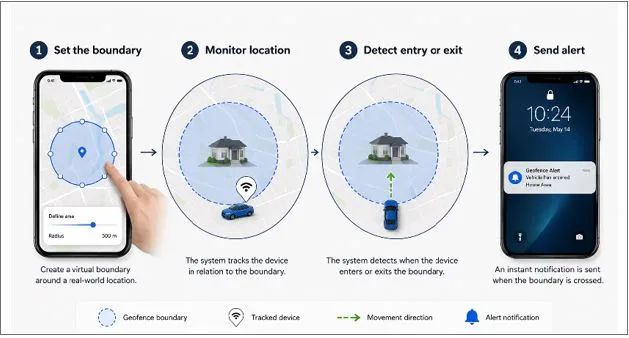
You do not need to watch a tracking map all day to know when a vehicle, person or asset reaches a particular place. A geofence can do that automatically, sending an alert when a tracked device enters or leaves a defined area.
The confusing part is usually not creating the virtual boundary. It is choosing the right size, trigger and notification settings so that the alerts are actually useful rather than late, inaccurate or constant.
This guide explains how to set up geofencing alerts from start to finish, regardless of the tracking app or platform you use. The buttons may have different names, but the basic process is remarkably similar. If you are still deciding which hardware or platform to build your setup around, it is worth comparing the geofencing features offered by before you commit, because update frequency and alert options vary far more between devices than most product pages suggest.
What Is a Geofence and How Do Geofence Alerts Work?
A geofence is a virtual boundary placed around a real-world location. It can surround a home, depot, warehouse, customer site, school, construction area or restricted zone.
When a GPS-enabled phone, vehicle tracker or other connected device crosses that boundary, the tracking software can record the event and trigger an alert by push notification, email or SMS.
How does geofencing work?
- You draw a boundary around a location on a map.
- A tracker or phone reports its current position.
- The software compares that position with the geofence.
- An entry, exit or other rule triggers the action you selected.
Think of it as an invisible tripwire on a digital map. Unlike This guide explains how to set up geofencing alerts from start to finish, regardless of the tracking app or platform you use. The buttons may have different names, but the basic process is remarkably similar. If you are still deciding which hardware or platform to build your setup around, it is worth comparing the geofencing features offered by Tracqueur before you commit, because update frequency and alert options vary far more between devices than most product pages suggest.
, which shows where something is and where it has been, geofencing tells you when it crosses a particular boundary. That distinction matters more than it first appears: tracking answers a question you have to remember to ask, while a geofence answers it for you.
What You Need Before Setting Up Geofencing Alerts
Before opening your tracking app, decide what you are trying to monitor. That single decision will influence the size of your geofence and the type of alert you need.
- A location-enabled device: This could be a smartphone, vehicle GPS tracker or asset tracker.
- A compatible tracking platform: The software needs to support geofence creation and alerts.
- A clear objective: For example, knowing when a van arrives at a customer site is different from detecting an unauthorised departure.
It is also worth checking one specification that rarely appears in marketing material: how often the device reports its position. A tracker that updates every ten seconds will register a boundary crossing far more precisely than one that reports every few minutes, and that difference shapes how well every rule you create afterwards performs.
For occasional personal use, a smartphone may be enough. For vehicles or valuable equipment, a dedicated GPS tracker is often more practical because it stays with the thing you actually want to monitor.
How to Set Up Geofencing Alerts Step by Step
Step 1: Open your tracking app or platform
Sign in to your GPS or fleet management system and find the section labelled something like Geofences, Zones, Places or Alerts.
The wording varies between platforms, so do not worry if your screen looks different from a tutorial. You are looking for the map-based tool used to create location boundaries.
Step 2: Find the location you want to monitor
Search for the address or postcode and centre the map on the area. Check the location carefully before drawing anything, particularly when several nearby properties have similar addresses.
For a business site, look at the actual entrance, parking area and surrounding roads. The physical location that matters operationally is not always the same as the address shown on a map. Rural industrial estates and shared yards are especially prone to this, where the postcode pin can land a street away from the gate a driver actually uses.
Step 3: Draw the geofence boundary
Most platforms offer either a circular boundary or a custom polygon.
- Circle or radius: Best for straightforward locations such as homes, shops and small depots.
- Polygon: Better for irregular properties, construction sites, large compounds and restricted areas.
A polygon is particularly useful when a simple circle would include a nearby road, car park or neighbouring property that should not count as part of the zone.
Step 4: Choose the right geofence size
This is one of the most important parts of setup. A boundary that is too tight can create false alerts because GPS positioning is not perfectly fixed.
Do not automatically trace the exact edge of a building or property. Give the geofence enough room to account for normal GPS variation, vehicle movement and the route a driver takes to enter the site. Some platforms even enforce a minimum radius for precisely this reason.
For example, a customer site may need a slightly wider boundary so that a van entering the correct driveway does not trigger an exit alert simply because the reported position shifts by a few metres. If you have ever been woken by a 3 am alert about a vehicle that never moved, this is almost always the cause.
Step 5: Give the geofence a clear name
Use names that make sense at a glance. Main Warehouse, Manchester Customer Site or Restricted Yard is far more useful than Zone 12.
If you manage multiple locations, a consistent naming system will make reports and notifications much easier to understand. Prefixing by region or client — Leeds – Depot, Leeds – Client A — keeps long lists sortable once you pass a dozen zones.
Step 6: Assign the correct device, vehicle or asset
Select which tracker should follow the rule. Some systems let you assign individual devices, while others allow groups of vehicles or assets.
Double-check this setting. A perfectly drawn geofence is useless if the wrong vehicle is attached to it.
Step 7: Choose the alert trigger
Now decide what event should generate a notification.
- Entry: Useful when you need to know that a vehicle or person has arrived.
- Exit: Useful for detecting departures or confirming that something has left a location.
- Entry and exit: Suitable for monitoring both arrival and departure.
- Dwell time: Useful when the duration spent inside an area matters.
If you are confirming a delivery or service visit, entry and exit can provide a simple record of arrival and departure rather than relying on a driver to report it manually.
Step 8: Choose how you want to be notified
Depending on the platform, you may be able to choose push notifications, email or SMS. Pick the channel you are most likely to notice promptly.
Check who receives the alert as well as how it arrives. Many systems allow notifications to be sent to specific users, roles or email addresses, and a security alert delivered only to an account nobody monitors at weekends is not really an alert at all.
For urgent security events, immediate mobile notifications may make more sense than email. For routine site visits, email summaries may be sufficient.
Step 9: Add time and day filters
You do not always need alerts every time a boundary is crossed. A depot may have normal activity during working hours but require an immediate warning at midnight.
Where supported, create rules such as after 6 pm, weekends only or outside working hours. This reduces unnecessary notifications and makes genuine exceptions easier to spot.
Step 10: Save and activate the geofence
Before saving, review the location, boundary, assigned device, trigger and notification method. Then activate the rule.
Do not assume it will work perfectly just because the settings look correct. A quick real-world test is worth doing before you rely on the alert for security, attendance or operational reporting.
How to Choose the Right Geofence Shape and Size
The best geofence reflects how the location is actually used, not simply how it looks on a map.
| Location | Recommended approach | Why |
| Home | Small radius | Simple and easy to maintain |
| Warehouse | Radius or polygon | Can cover the building and access area |
| Construction site | Polygon | Follows an irregular site boundary |
| Restricted area | Polygon | Provides more precise control |
| Service region | Large boundary | Suitable for broader territory monitoring |
Remember that a geofence is not a physical wall. GPS positions can drift, particularly around tall buildings, in tunnels or in underground car parks where satellite visibility is poor. A sensible buffer is often more reliable than an excessively precise boundary.
Which Geofence Alert Should You Choose?
| Your goal | Best trigger |
| Know when a vehicle arrives | Entry |
| Know when it leaves | Exit |
| Monitor a restricted location | Entry and exit |
| Measure time at a customer site | Entry and exit or dwell |
| Monitor after-hours activity | Entry with time filters |
| Confirm a delivery arrival | Entry |
Choosing fewer, more meaningful rules is usually better than enabling every available alert. The aim is to surface exceptions, not create a constant stream of notifications. Alert fatigue is real, and a system that pings twenty times a day is one people quietly learn to ignore.
How to Test Your Geofencing Alerts
- Confirm the tracker is online and reporting its location.
- Check that the correct device is assigned to the geofence.
- Test an entry event where practical.
- Test an exit event if both are enabled.
- Confirm the notification arrives through the selected channel.
- Adjust the boundary if the result is inaccurate.
In practice, the most reliable test is the simplest one: drive through the boundary at normal speed and note how long the alert takes to arrive. This can reveal problems that are difficult to spot from the settings screen, particularly when the boundary sits too close to a road or building.
How to Prevent False or Unwanted Geofence Alerts
Most unwanted alerts come from an overly tight boundary or overly broad notification rules.
- Leave a practical buffer around the location.
- Use time and day filters where appropriate.
- Only assign relevant devices to the rule.
- Consider how often the tracker updates its position.
- Avoid creating overlapping geofences without a clear reason.
A tracker that reports its position less frequently may not register the exact moment a boundary is crossed. That does not necessarily mean the geofence is broken; the location update itself may simply be delayed.
Why Are My Geofence Alerts Not Working?
No alert was received
Check that the tracker is online, the geofence is active and the correct device is assigned. Also confirm that notifications are enabled for the chosen channel, including at the phone’s own settings level, where push notifications are often muted without anyone realising.
The alert arrived late
The tracker may have a low location-update frequency or temporarily poor connectivity. A system cannot trigger an event until it receives usable location data, so a vehicle emerging from a multi-storey car park may report several positions at once, slightly after the fact.
I am getting false entry or exit alerts
The boundary may be too small. Increase the buffer and test again. GPS drift can be enough to move a reported position across a boundary that was drawn too tightly.
I am receiving too many alerts
Narrow the rules. Time filters, device-specific settings and sensible boundaries can turn a noisy system into a useful one.
Smartphone Geofencing vs a Dedicated GPS Tracker
Smartphone-based geofencing can work well when the person being monitored reliably carries the phone and keeps location services enabled.
A dedicated GPS tracker is generally more appropriate for vehicles, trailers, plant and other assets because the tracker remains with the item rather than depending on someone’s phone. Battery-saving settings on modern handsets can also delay or suppress background location updates, which is a common and frustrating cause of missed alerts.
The choice comes down to what you need to follow. For a person, a phone may be sufficient. For a van, generator or trailer, a usually the more dependable option.
Practical Ways to Use Geofencing Alerts in the UK
Vehicle and fleet monitoring
Businesses can create geofences around depots and customer sites to record arrivals, departures and time spent on location.
Theft and unauthorised movement
A geofence around a yard can be configured to alert you when a vehicle leaves outside expected hours, helping you identify unusual movement quickly.
Delivery and service confirmation
Entry and exit events can provide a useful digital record of when a vehicle reached a site and when it left, supporting operational reporting and customer queries.
Construction and equipment monitoring
Geofences can help monitor equipment and vehicles around construction sites, storage yards and other restricted areas.
Personal and family reassurance
Away from fleets and depots, geofencing is widely used at home. A boundary around a house can let a carer know when an older relative living with dementia has left the property, and a zone around a school can confirm a child has arrived safely without anyone needing to phone and check. The technology is identical; only the reason for using it changes.
Geofencing, Employee Tracking and UK Privacy
Businesses using GPS geofencing to monitor employees should consider transparency, necessity and proportionality. Tracking a company vehicle for legitimate operational reasons is not the same as monitoring every aspect of an employee’s private life.
Under UK data protection law, employers need a lawful basis for processing workers’ location data, and systematic monitoring of this kind will usually require a data protection impact assessment before it begins. The broad principle is to monitor in the least intrusive way that still achieves the purpose — which is another argument for a handful of well-chosen geofences rather than blanket coverage.
Employees should understand what is being tracked, why it is being tracked and when monitoring applies. This is particularly important where company vehicles may also be used for personal journeys; many platforms offer a private mode or out-of-hours setting for exactly this situation, and using it tends to do more for workforce trust than any policy document.
For current requirements, organisations should review applicable UK data protection rules and the Information Commissioner’s Office guidance on monitoring workers before introducing workplace location monitoring.
Common Geofencing Mistakes to Avoid
- Making the boundary so small that normal GPS variation triggers alerts.
- Choosing an entry alert when you actually need an exit alert.
- Assigning the wrong tracker to the geofence.
- Skipping the test phase.
- Ignoring the tracker’s location-update frequency.
- Creating too many unnecessary zones.
- Leaving alerts active during routine hours when they add no value.
- Assuming a geofence is perfectly precise in every environment.
Frequently Asked Questions About Geofencing Alerts
What is a geofence in simple terms?
A geofence is a virtual boundary around a real-world location. A compatible tracker can trigger an alert when it enters or leaves that area.
How do I set up a geofence?
Open a compatible tracking app, find the geofence or zones tool, choose a location, draw a boundary, assign a device and configure the required alert.
How accurate is geofencing?
Accuracy depends on the device, GPS conditions, update frequency and surrounding environment. In open areas performance is generally strong, while buildings, tunnels and underground parking can affect positioning for short periods.
Can I set alerts for entering and leaving an area?
Yes. Most geofencing platforms support entry, exit or both, although the exact options vary by provider.
Can geofencing work without a dedicated GPS tracker?
Yes. Some smartphone apps can use the phone’s location services for geofencing. Dedicated trackers are more useful when monitoring vehicles and physical assets.
How many geofences can I create?
This varies considerably. Some consumer apps limit you to a small number of zones, while fleet platforms typically allow far more. It is worth checking the limit before planning a setup around dozens of customer sites.
Is geofencing legal in the UK?
Geofencing itself is not inherently unlawful, but workplace and personal location tracking can involve privacy and data protection obligations. Businesses should assess the purpose and proportionality of monitoring and follow applicable UK requirements.
Final Checklist: Set Up Your Geofence Correctly
- Choose the right tracking device and platform.
- Find the correct location.
- Draw a suitable boundary.
- Allow for GPS variation.
- Name the zone clearly.
- Assign the correct device.
- Choose entry, exit or dwell alerts.
- Select the appropriate notification method.
- Check who receives the alert.
- Add time or day filters where needed.
- Save and activate the rule.
- Test the alert before relying on it.
Conclusion
Setting up geofencing alerts is straightforward once you stop thinking of the geofence as the finished product. The boundary is only the starting point. The real value comes from choosing a sensible size, attaching the right device, selecting the right trigger and testing the result in real conditions.
The most effective geofencing setup is not the one that sends the most alerts. It is the one that tells you about the events that actually matter — and, just as importantly, stays silent the rest of the time. Start with one useful location, one clear objective and one well-tested rule, then expand from there.