
As Online Commerce Expands, Clearer Photos Become a Basic Requirement for Small Businesses
When people talk about online business, they usually mention the same topics: advertising costs, social media algorithms, or search rankings. One thing that gets less attention, but still does a lot of silent work in the background, is the quality of a simple photo.
A product image on a marketplace. A profile picture on a booking site. A social post announcing a new service.
Very often, that single image does most of the heavy lifting. Visitors decide in a second or two whether they feel comfortable, curious, or slightly suspicious. And they do this long before they read a full paragraph of text.
For big brands, the answer has long been to hire photographers, book studios and treat each campaign like a mini photo shoot. For small businesses, solo creators and local services, that is rarely an option. Many are working with a phone, a window, and a bit of free time after hours.
So the question becomes very practical: how can smaller teams improve photo quality enough to be taken seriously, without turning their whole schedule upside down?
A growing number of them are putting together lightweight workflows that mix basic shooting habits, simple editing and, more recently, AI-based tools. One of these tools is Pixflux.AI’s Photo Enhancer, an online service that takes existing images and tries to make them clearer and cleaner, while still looking like the real thing.
This article looks at the main problems owners run into and how a straightforward approach can already make a visible difference.
The Same Problems Show Up Again and Again
Talk to ten small business owners who sell or promote online and you will hear very similar frustrations about their photos.
Blurry or soft subjects. Pictures taken quickly, especially indoors, often end up just a bit out of focus. Labels can’t be read, jewellery details disappear, and even faces look tired when they are simply not sharp.
Flat lighting. Indoor bulbs, dark corners and mixed light sources create a grey, low-contrast look. The product might be colourful in reality, but on screen it looks dull. In other words, the photo doesn’t reflect the effort that went into the product.
Noise and compression. Screenshots of screenshots, images forwarded over messaging apps, and older phones all leave their mark. Darker areas fill with grain or blocky artifacts. On a big monitor it might be acceptable, but on a small phone screen the flaws are hard to ignore.
Strange colours. A white plate looks slightly yellow. Skin tones drift toward red or blue. A brand colour that should be calm and muted becomes oversaturated. None of these things are “fatal”, but together they chip away at trust.
Most owners can see that something is off, even if they can’t always explain what or why. That’s where a simple structure can help.
A Three-Step Method: Fix, Enhance, Prepare
Many small brands that have gradually improved their visuals tend to follow a similar pattern, whether they realise it or not. It can be summed up as: Fix → Enhance → Prepare.
1. Fix: Give Yourself a Better Starting Point
First, there are a few habits at the shooting stage that require almost no budget:
- Rest the phone on a shelf, tripod or stack of books instead of holding it in the air.
- Move closer to a window or a door to use natural light.
- Tap to focus on the product or face before pressing the shutter.
- Take two or three variations instead of only one.
After that, the built-in editor on a phone usually offers enough to clean things up:
- Crop out busy edges and straighten a tilted horizon or table.
- Gently adjust exposure if the image is clearly too dark or too bright.
- Add a small amount of contrast so the subject stands out from the background.
These are small actions, but they often remove the worst distractions. In some cases, they are all that is needed.
2. Enhance: Recover Detail When You Can’t Reshoot
Of course, in real life, not every photo can be taken again. The product has already shipped. The event is over. Or the person in the picture is simply not available.
This is where AI-based photo enhancers have started to appear in the toolkit of many small businesses. Rather than changing the style of an image, they aim to:
- sharpen soft edges,
- reduce noise in darker areas, and
- bring back a bit of texture that was lost.
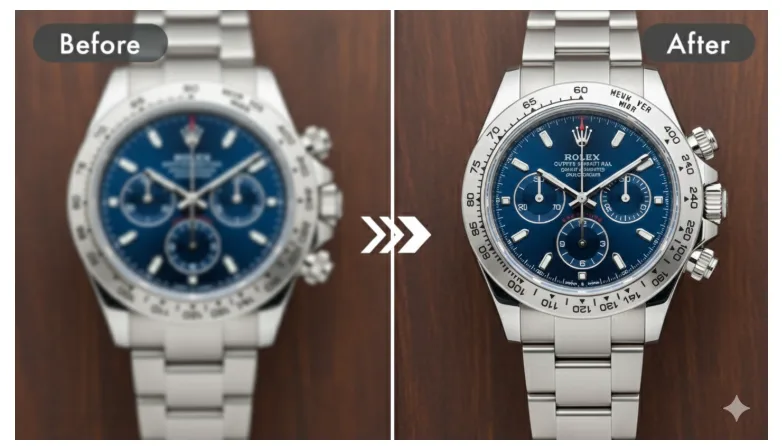
Pixflux.AI’s Photo Enhancer, for instance, works in this way. Users upload a photo—often a product image, a portrait or a social media visual—choose an enhancement level, and then compare the “before” and “after” versions in the browser. The tool tries to keep colours and overall mood close to the original, focusing instead on clarity and noise reduction.
In informal feedback from small online sellers, several use cases come up repeatedly:
- recovering slightly blurry shots of packaged goods or labels,
- cleaning up photos taken in a restaurant or home kitchen where light is tricky,
- improving older images that have been compressed many times.
The aim is not to transform a casual snapshot into a glossy advertisement. It is simply to make sure potential customers can actually see what is being offered.
3. Prepare: Match the Image to Its Final Home
The last step is about respecting the reality of each platform.
- On social networks, most viewers see content on a vertical phone screen. A tight crop and clear subject often work better than a wide, detailed scene.
- On marketplaces and e-commerce sites, customers zoom in. They expect to inspect stitching on clothing or small details on electronics packaging.
- On websites and landing pages, images should load quickly while still looking sharp.
A few routines help here:
- Keep one high-resolution “master” file per important photo.
- Export platform-specific copies instead of relying on one image for everything.
- After uploading, look at the live page on a phone. If text or details are still hard to read, it may be worth going back one step.
A Short Checklist Before Hitting “Publish”
Over time, many owners end up with their own mental list. A written checklist can make the process easier to share with a team:
- Can I clearly see the main subject when I zoom in once?
- Is the lighting even enough that nothing essential disappears into shadow?
- Do the colours feel close to reality, especially for skin and key brand elements?
- Is noise or pixelation the first thing my eye notices in dark areas?
- Does the crop make sense on a small screen, not just on my laptop?
If one of these answers is “not really”, a minor adjustment or another pass through an enhancer can often fix it in under a minute.
A More Even Playing Field for Small Businesses
High-end photo campaigns will probably remain the domain of big brands. But basic visual clarity does not have to be. A simple combination of better shooting habits, light editing and tools like Pixflux.AI’s Photo Enhancer gives smaller players a way to present their work more accurately.
This is not about making everything look perfect. It is about giving products, services and stories a fairer chance to be seen and understood.
When a visitor decides to stay on a page, scroll through a gallery or read a description, it is rarely because of one magic trick. Often, it is because nothing pushed them away—the images were clear, honest and easy to read. For thousands of small businesses moving online, that is already a meaningful step forward.