
How to Recover Permanently Deleted Files Without Losing Your Data
Accidentally deleting an important document, photo, or video can be stressful, especially when you’ve already emptied the Recycle Bin or used Shift + Delete. However, permanent deletion doesn’t always mean your files are gone forever. Depending on your storage device and how much new data has been written, recovery may still be possible.
If you’re wondering how to recover permanently deleted files, this guide covers five practical methods for Windows 10 and 11. From built-in backup features to dedicated recovery software, you’ll learn how to retrieve missing files and improve your chances of successful recovery.
What Happens When You Permanently Delete a File?
When you permanently delete a file, Windows typically removes its file system reference and marks the occupied storage space as available for new data. The original content may remain on the drive until that space is reused.
This means recovery is sometimes possible, but it isn’t guaranteed. New downloads, software installations, and file transfers may overwrite deleted data. SSDs also introduce an additional challenge because TRIM can tell the drive to clear blocks associated with deleted files.
Before trying any recovery method, take these precautions:
- Stop saving new files to the affected drive.
- Avoid installing recovery software on the drive containing deleted data.
- Prepare another drive to store recovered files.
- Don’t format or repartition the affected device.
- Avoid running unnecessary disk repair operations.
Acting quickly can make a significant difference.
5 Ways to Recover Permanently Deleted Files on Windows
Method 1. Restore Files Using File History
File History is a Windows backup feature that saves copies of files from selected folders. If it was enabled before deletion, you may be able to retrieve an earlier version.
Open Control Panel, navigate to File History, and select Restore personal files. Browse the available backup versions, locate the missing files, and restore them to your computer.
You can also right-click the original folder, select Restore previous versions, and check whether an earlier copy is available.
Method 2. Recover Files from OneDrive
If your Desktop, Documents, or Pictures folders were synchronized with OneDrive, your missing files may still be available online.
Sign in to OneDrive using your Microsoft account and open its Recycle Bin. Find the deleted items, select the files you need, and click Restore.
If the files were permanently removed from OneDrive as well, check whether another backup or version is available. Recovery options depend on your account type and retention settings.
Method 3. Use Windows File Recovery
Microsoft offers a free command-line utility called Windows File Recovery. It can attempt to retrieve permanently deleted files from local drives, external hard drives, and USB devices.
Download it from the Microsoft Store, launch it as an administrator, and use the following command format:
winfr C: D: /regular /n *.docx
Replace C: with the source drive and D: with a different destination drive. You can change *.docx to another file extension, such as *.jpg or *.pdf.
Press Enter and follow the prompts to begin scanning. Regular mode is suitable for recently deleted files on healthy NTFS drives, while Extensive mode can help with older deletions, formatted drives, and other file systems.
For more details, refer to Microsoft’s Windows File Recovery guide.
Method 4. Recover Deleted Files with 4DDiG Data Recovery
If you don’t have a backup or Windows File Recovery cannot locate your files, dedicated recovery software offers another option.
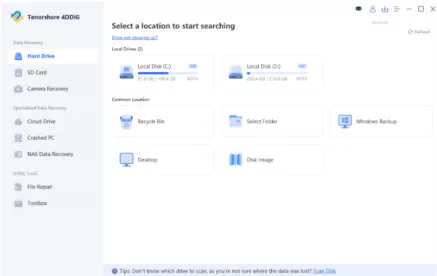
Tenorshare 4DDiG Windows Data Recovery is designed to retrieve lost data from supported storage devices, including internal hard drives, external drives, USB flash drives, and SD cards.
It supports various file types, including photos, videos, documents, and audio files. You can also preview supported files before restoring them.
Here’s how to use it:
- Download and Launch 4DDiG: Visit the official 4DDiG Data Recovery website, download the software, and install it on a different drive from the one containing your deleted files.
- Select a Storage Location: Launch the program and choose the drive or partition where the files were originally stored.
- Scan for Deleted Files: Start scanning and browse the results by file category. Use the search and filter features to locate specific items.
- Preview and Recover: Preview supported files, select the ones you need, and click Recover. Save them to another storage device rather than the original drive.
This approach helps when no backup exists and built-in tools can’t locate the files.
Method 5. Check Other Available Backups
If the previous methods don’t work, look for additional copies of your missing files. You may have saved them elsewhere without realizing it.
Check external hard drives, USB backups, Google Drive, Dropbox, email attachments, and other computers. If you previously shared a document or photo, the recipient may also have a copy.
Restoring an existing backup is often more reliable than attempting to reconstruct deleted data from a storage device.
How to Improve Your Chances of File Recovery
Successful recovery depends on the storage device, deletion circumstances, and whether the original data remains intact.
Traditional HDDs may retain deleted data until new information overwrites the same space. SSDs are more complicated because TRIM can make deleted data inaccessible even before new files are written—so on an SSD, attempt recovery as soon as possible.
If the device makes unusual noises or repeatedly disconnects, stop using it and consider professional recovery assistance.
Final Thoughts
Permanently deleted files aren’t necessarily lost forever. File History, OneDrive, Windows File Recovery, and other backups offer several ways to retrieve missing data.
When no backup is available, Tenorshare 4DDiG Windows Data Recovery offers another practical option for scanning supported storage devices and restoring recoverable files. Minimize activity on the affected drive and save recovered data elsewhere to avoid further loss.